Introduction
The “Update an Entry” step is a feature of the Form Connector extension which provides way to update entries in other forms and complete Approval or User input steps.
Update an existing entry
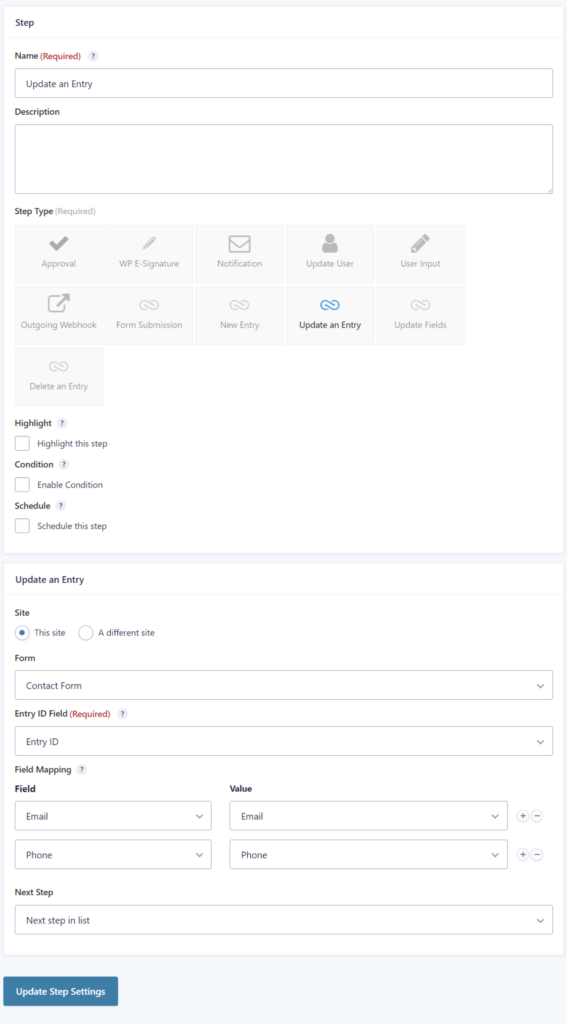
To add an “Update an Entry”, configure the standard step settings and select the target form. Select the field in the current form to be used as the source for the target Entry ID. This field, for example, could be a number field that is set to admin-only and pre-populated with the value of a URL parameter. The Field Mappings setting defines which fields of the target form should be updated, and which fields from the current form should be used as the source. Select “Custom Value” to specify a static value, a merge tag or a combination of both.
The Entry ID field
This is used to look up the target entry. This field must contain the ID of the entry that will be updated.
If the target form is also the source form, then the “Entry ID (Self)” option will be available in the list of fields for the Entry ID field setting. This provides an easy way to update field values in the same entry.
TIP: If you don’t want the user to enter the target entry ID manually every time the form is submitted, then try adding a hidden field to the form and use Gravity Forms dynamic population to set the value of the field automatically.

To update an entry for a form on a different server, select “a different server” in the server setting, and enter the Gravity Forms Web API details. Once you’ve saved the credentials, the process for remote forms is the same as above for local forms.
Approve an existing Entry
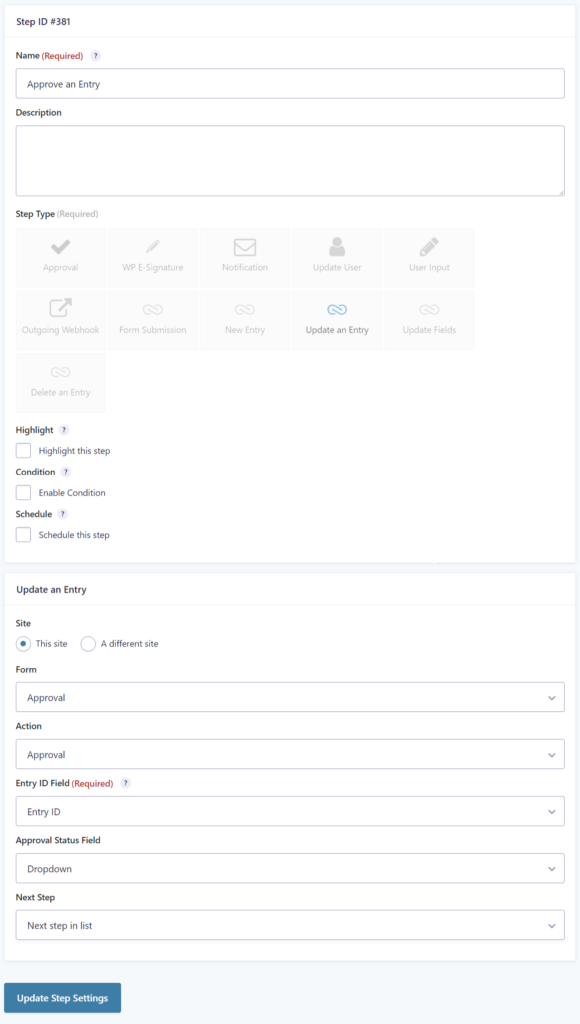
The Form Connector can process a workflow step of a different entry. The current step for the target entry must be an Approval step.
Select the field in the current form to be used as the source for the target Entry ID. This field, for example, could be a number field that is set to admin-only and pre-populated with the value of a URL parameter.
Select the field in the current form to be used as the source for the approval status. For example, this might be a Radio Button field with two options – the values for the options should be ‘approved’ and ‘rejected’.

Approve on the same server
For forms on the same server, the current user must be an assignee otherwise this step will have no effect.
Approve on a different server
To approve an entry for a form on a different server, select “a different server” in the server setting, and enter the Gravity Forms Web API details. Once you’ve saved the credentials, the process for remote forms is the same as above for local forms. For remote forms, you need to select the assignee you’d like to impersonate when the entry is approved.
Complete a User Input Step
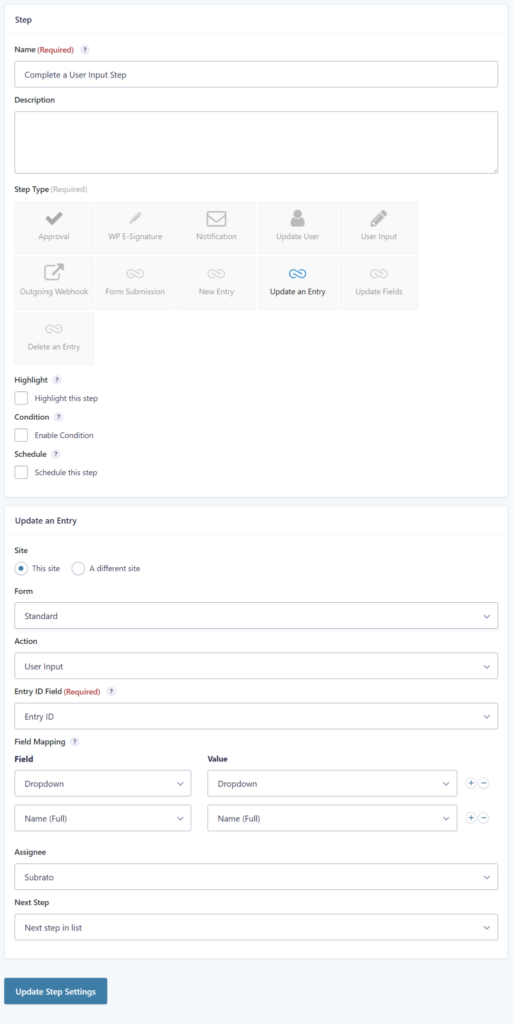
The Form Connector can process a workflow step of a different entry. This action is just like the ‘update an entry’ action except for the status of the user input step will be set to ‘complete’. The current step for the target entry must be a user input step and the current user must be an assignee, otherwise, this step will have no effect.
Select the field in the current form to be used as the source for the target Entry ID. This field, for example, could be a number field that is set to admin-only and pre-populated with the value of a URL parameter.
The Field Mappings setting defines which fields of the target form should be updated and which fields from the current form should be used as the source. Select “Custom Value” to specify a static value, a merge tag, or a combination of both.
To complete a user input step in an entry for a form on a different server, select “a different server” in the server setting and enter the Gravity Forms Web API details. Once you’ve saved the credentials the process for remote forms is the same as above for local forms. For remote forms, you need to select the assignee you’d like to impersonate when the step is completed.

Complete a step in the same server
For forms on the same server, the current user must be an assignee, otherwise, this step will have no effect.
Complete a step in another server
To complete a User Input step for a form on a different server, select “a different server” in the server setting and enter the Gravity Forms Web API details. Once you’ve saved the credentials, the process for remote forms is the same as above for local forms. For remote forms, you need to select the assignee you’d like to impersonate when the entry is approved.