Setup Instructions
- Create a Form in Gravity Forms (or use the sample form below), which will be used for the WooCommerce integration. Whenever an order is created, an entry will be created in this form and the workflow will begin immediately. Add any fields you need for your workflow. See below for the fields that can be mapped to WooCommerce order properties. You may add as many forms as you like and enable “Create Entry” in all of them. This will spawn multiple workflows in parallel.
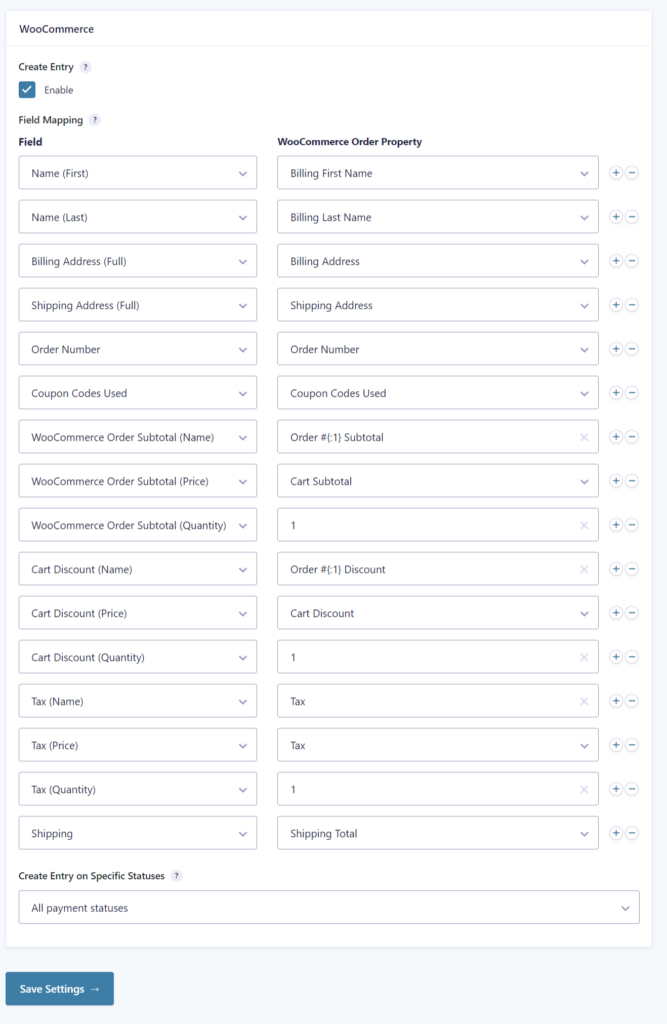
- Open the form settings and click on the WooCommerce tab. Check “Enable” for “Create Entry” if you’d like an entry to be added automatically to the form when a WooCommerce Order is created. When it’s enabled, you can map fields in your form to WooCommerce Order Properties, such as Billing information, Order Number, Cart Subtotal etc. (see a full list below). This means that values from the WooCommerce order will be copied over to the Gravity Forms entry when the order is created.
- (Added in version 1.1) Create Entry on Specific Statuses: You can switch from “All payment statuses” to “Selected payment statuses”, and check only the statuses you need. For advanced entry creation control, you can refer to this developer documentation.
Note that when the order status is changed in a WooCommerce order, entries in the target forms (forms with “Create Entry” enabled) will be updated to reflect the latest payment information collected (such as payment status, payment method, payment date and transaction id).
You can only use the Capture Payment Step and Cancel Order Step in a form when “Create Entry” is enabled.

Supported WooCommerce Order Properties
The following properties in WooCommerce Orders can be mapped to your form fields:
- Order ID
- Order Number
- Order Status
- Order Date
- Cart Total
- Cart Subtotal
- Payment Method
- Transaction ID
- Currency
- Currency Symbol
- View Order URL
- User ID
- Billing First Name
- Billing Last Name
- Billing Company
- Billing Address
- Billing Email
- Billing Phone
- Billing Address Line 1
- Billing Address Line 2
- Billing City
- Billing Postcode
- Billing Country Code
- Billing Country
- Billing State Code
- Billing State
- Shipping First Name
- Shipping Last Name
- Shipping Company
- Shipping Address
- Shipping Address Line 1
- Shipping Address Line 2
- Shipping City
- Shipping Postcode
- Shipping Country Code
- Shipping Country
- Shipping State Code
- Shipping State
- Shipping Method
- Cart Discount
- Tax
- Shipping Total
- Shipping Tax
- Are prices inclusive of tax?
- Customer Note
- Coupon Codes Used
- Total Number of Items
It’s not currently possible to map line items or custom checkout fields to Gravity Forms right in the Settings. However, it is supported as a developer feature – with custom development you can have more flexibility on mapping fields, see an example here.
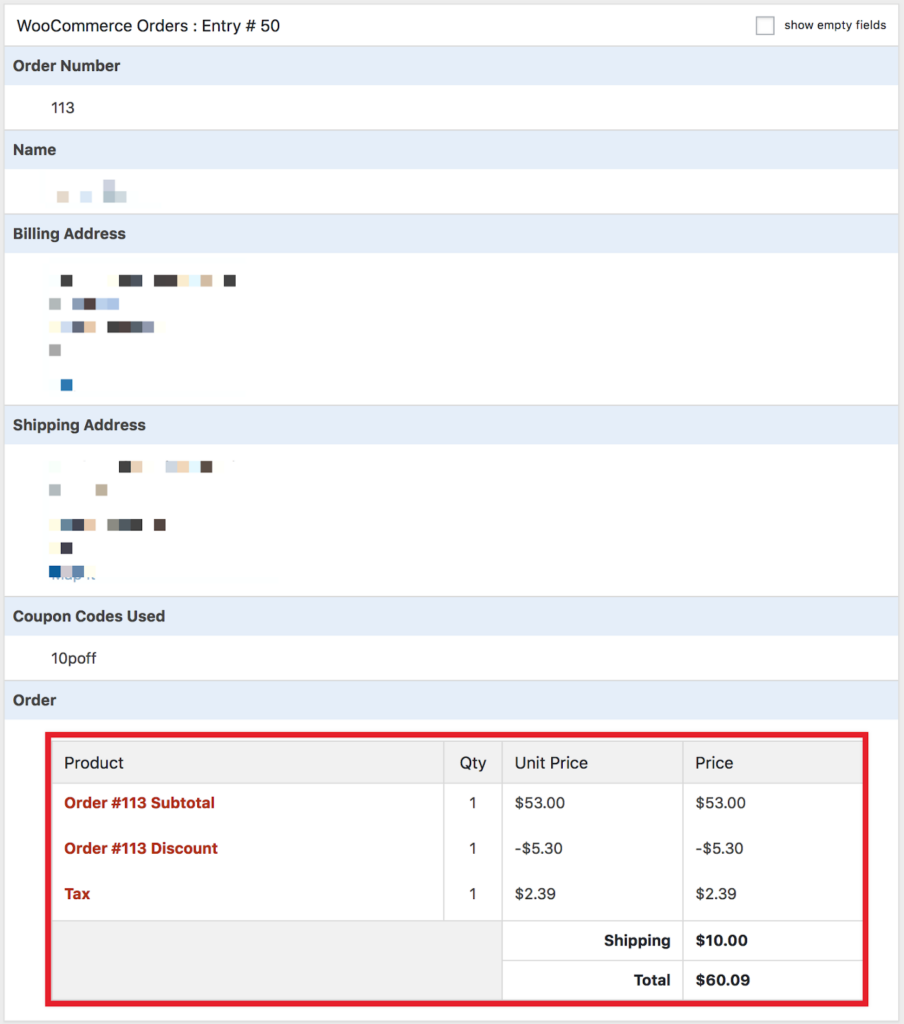
Display Order Summary in Entry Details
To display an Order Summary on the entry details page, you’ll need to add some Pricing fields to a form. We use the following three fields to get the order summary matched to the values in a WooCommerce order:
- Product field (Single Product) to map Cart Subtotal
- Product field (Single Product) to map Cart Discount
- Product field (Single Product) to map Tax
- Shipping field (Single Method) to map Shipping Total
If you don’t use coupons, tax or shipping in your store, you can skip them and just use one Product field (Single Product) to map Cart Total.

Set up the entry user (the created_by field)
By default, ‘the user’ (the created_by field) of entries created from WooCommerce orders will be set to the system default user (the administrator, for example), since the entries are created by the system automatically. ‘The user’ will also be displayed as the “Submitter” in your workflow pages. If you want to assign a different user to these entries when they are created, you can use the gravityflowwoocommerce_new_entry filter for such purposes.