Overview
The Advanced Post Creation Add-On allows you to convert submitted entries into a WordPress post, page, or custom post type, including extensive control of multiple features and metadata using the feed settings. For detailed setup instructions, see the Advanced Post Creation Add-On Documentation.
Gravity Flow Integration
Gravity Flow ensures that if your workflow contains a step associated with an Advanced Post Creation feed, the default post-submission feed will not execute independently. This allows precise control over when posts are created or updated, and ensures workflow steps such as approvals or conditions run before post submission.
Create a Form and a Feed
To set up a workflow that generates content, you must first create a Form and an Advanced Post Creation (APC) Add-On feed. If you already have a Form and feed, ensure it includes the necessary fields and settings outlined below, as these are used in the examples throughout this guide. You can also download the pre-built Form (No Workflow) and import it to your site.
Note: A Form with an associated APC feed is required to configure any workflow steps that create or update posts. Refer to the Advanced Post Creation Add-On documentation for detailed instructions on creating a Form with a feed.
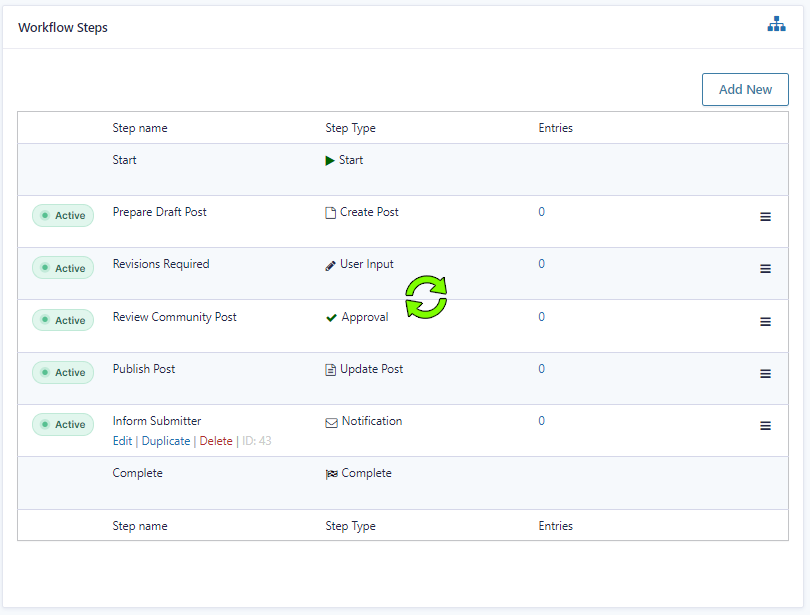
Creating a Post Creation Workflow Step
We can now create a workflow to manage the entry through reviews, edits, and optional payment steps, notifying each assignee as needed.
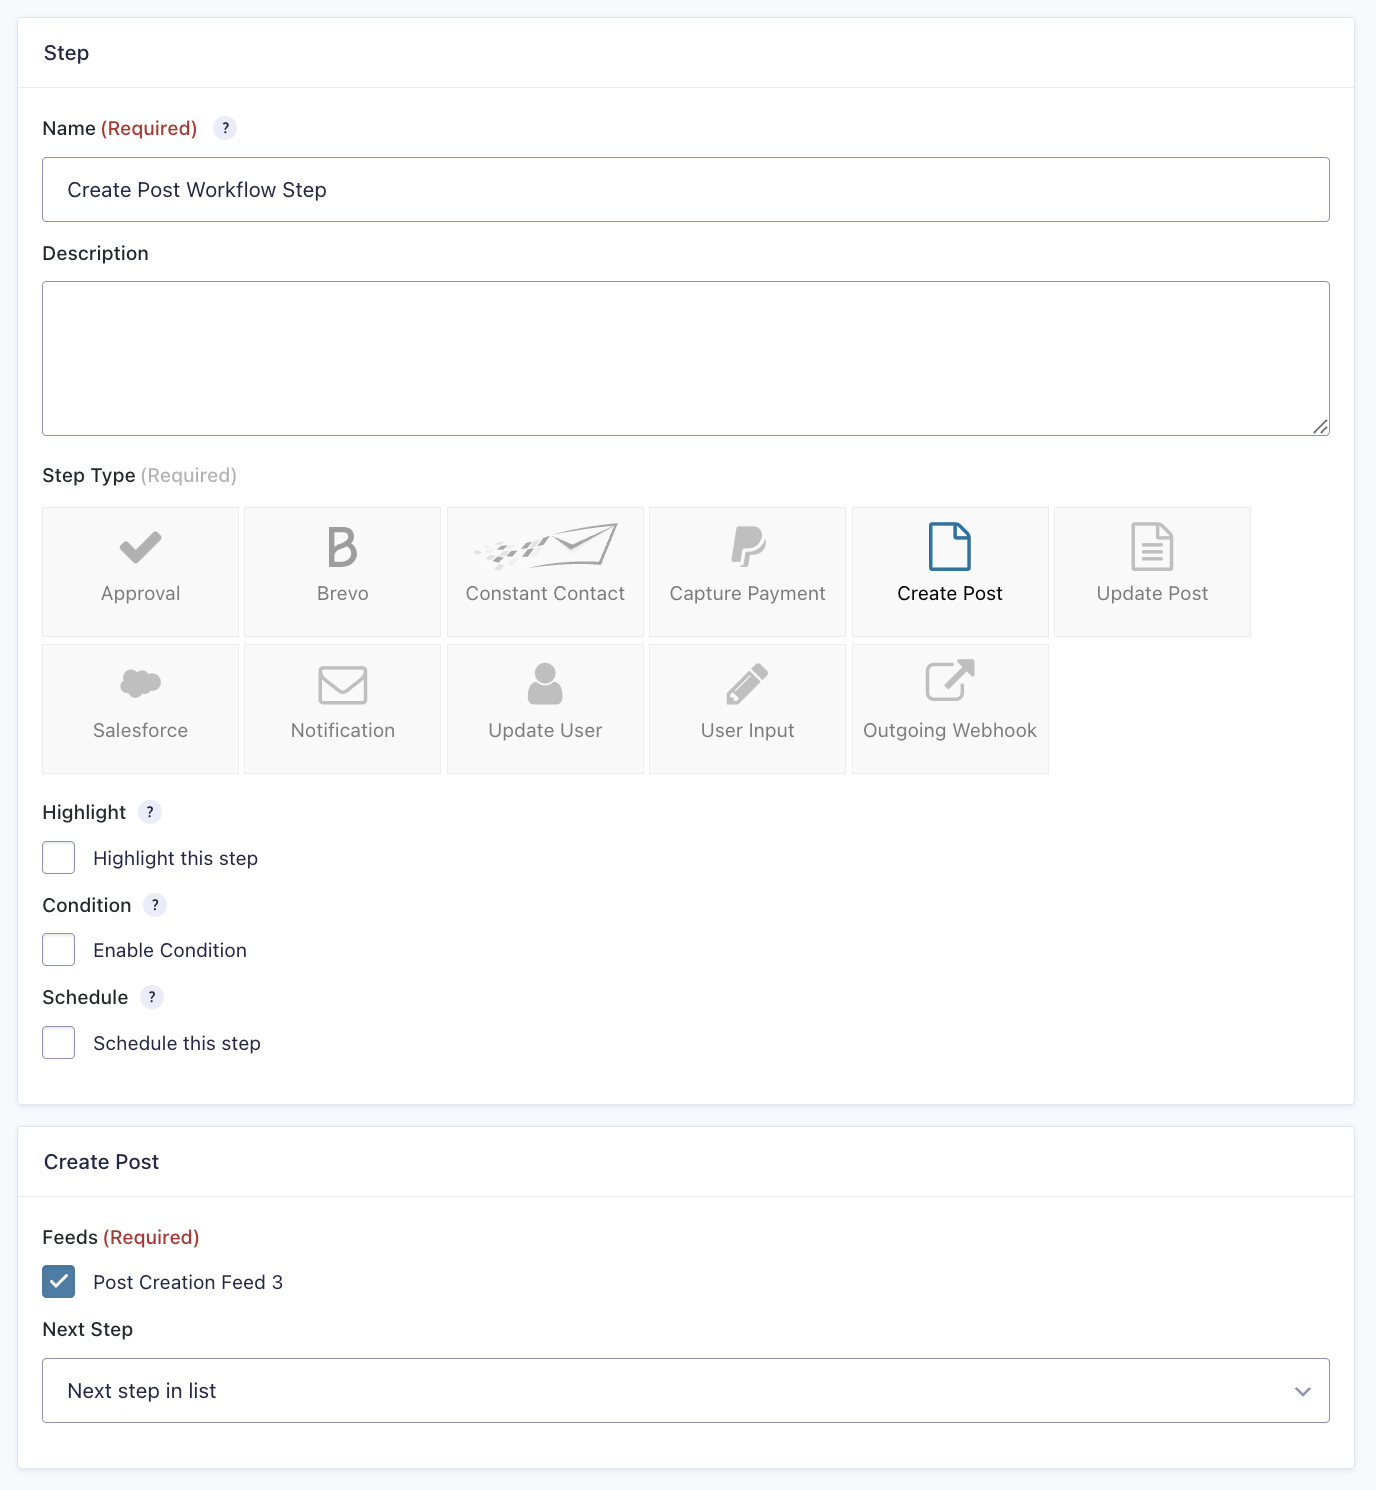
- From the Form Editor screen, navigate to Settings → Workflow.
- Select Add New Step and enter a Name for the step.
- Choose the Create Post step as the Step Type.
- Select an Advanced Post Creation Feed that was created using the add-on.
- Click Update Step Settings to save the step.
Create an Approval Loop
You can create an approval loop that allows approvers to send the entry back to the submitter (email field) to update values on the form. This process is covered in detail in the Configuring an Approval Process user guide.
Create a User Input Step
Make the following changes from the default settings:
- Step Name.
Revisions Required - Step Type.
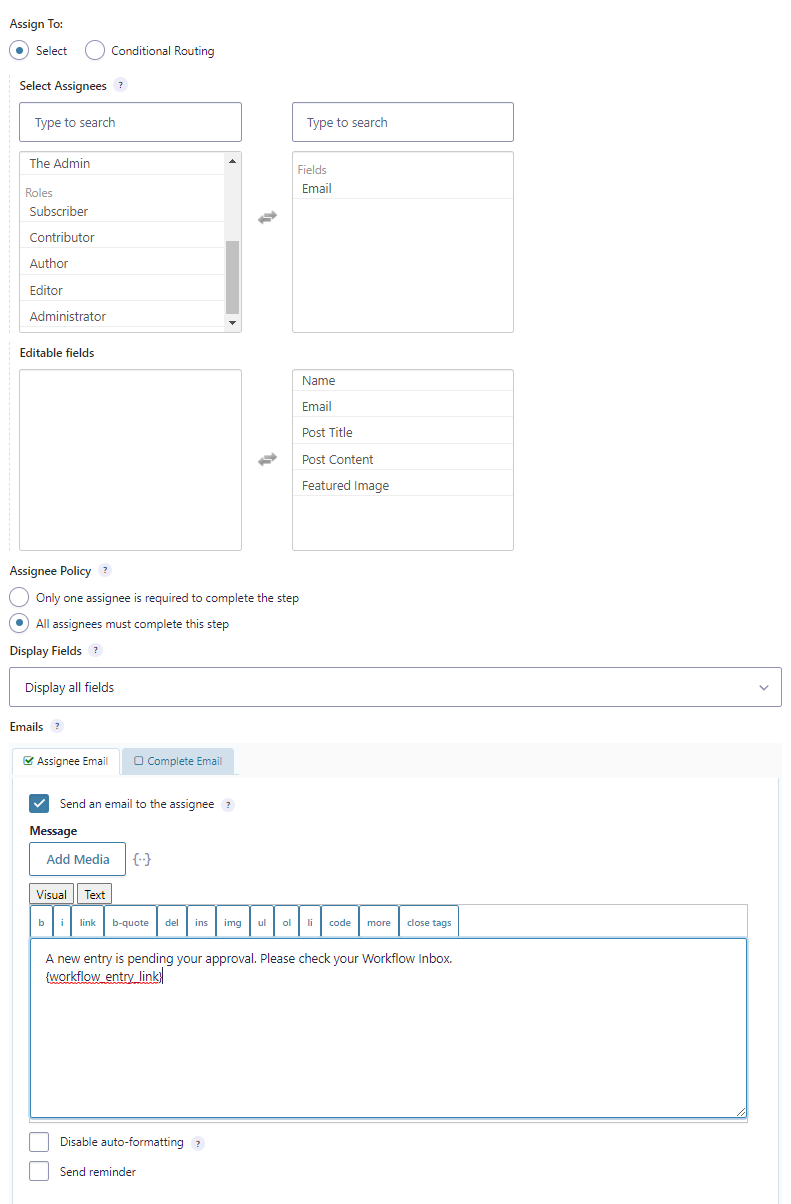
User Input - Assignee(s).
Select the Email field in your form - Editable Fields.
Select all fields
Note: There is no need to configure an assignee email because the approval step includes a “Revert to User Input” notification that will handle communication.
- Update the Confirmation Message.
Thank you. We will review your proposed changes and let you know if it is ready to be published.
Create an Approval Step
Make the following changes from the default settings.
- Step Name.
Review Community Post - Step Type.
Approval - Assignee(s).
Select the user or role responsible for reviewing content before publication - Revert to User Input Step.
Enable and select the “Revisions Required” step - Workflow Note.
Required if the entry is reverted or rejected
Activate the Rejection Email
- Select the Email field in your form as the recipient
- Include the
{workflow_note}merge tag so the user understands why their content was not approved
Activate the Revert Email
- Select the Email field in your form as the recipient
- Include the
{workflow_entry_link}merge tag so the user can access the entry to edit - Include the
{workflow_note}merge tag so the user understands the required changes
{workflow_entry_link:text="Your entry is almost ready for publishing.
Please revise your entry based on our editors feedback"}<br>{workflow_note}
Make a small change to the Create Post step you configured
- From the Form Editor screen, navigate to Settings → Workflow and edit the “Prepare Draft Post” step.
- At the bottom of the settings, set the Next Step to the “Review Community Post” approval step you created.
- Save the settings.
This ensures that the User Input step is only included in the workflow when the approval assignee chooses to revert to it.
We are now ready to update and publish the post. If you want to charge (or pay) for published content, this would be a great spot in the workflow to add a Stripe based capture payment step.
Create Post Step Settings Reference
Creating a Post Update Workflow Step
To add an Update Post step to the workflow.

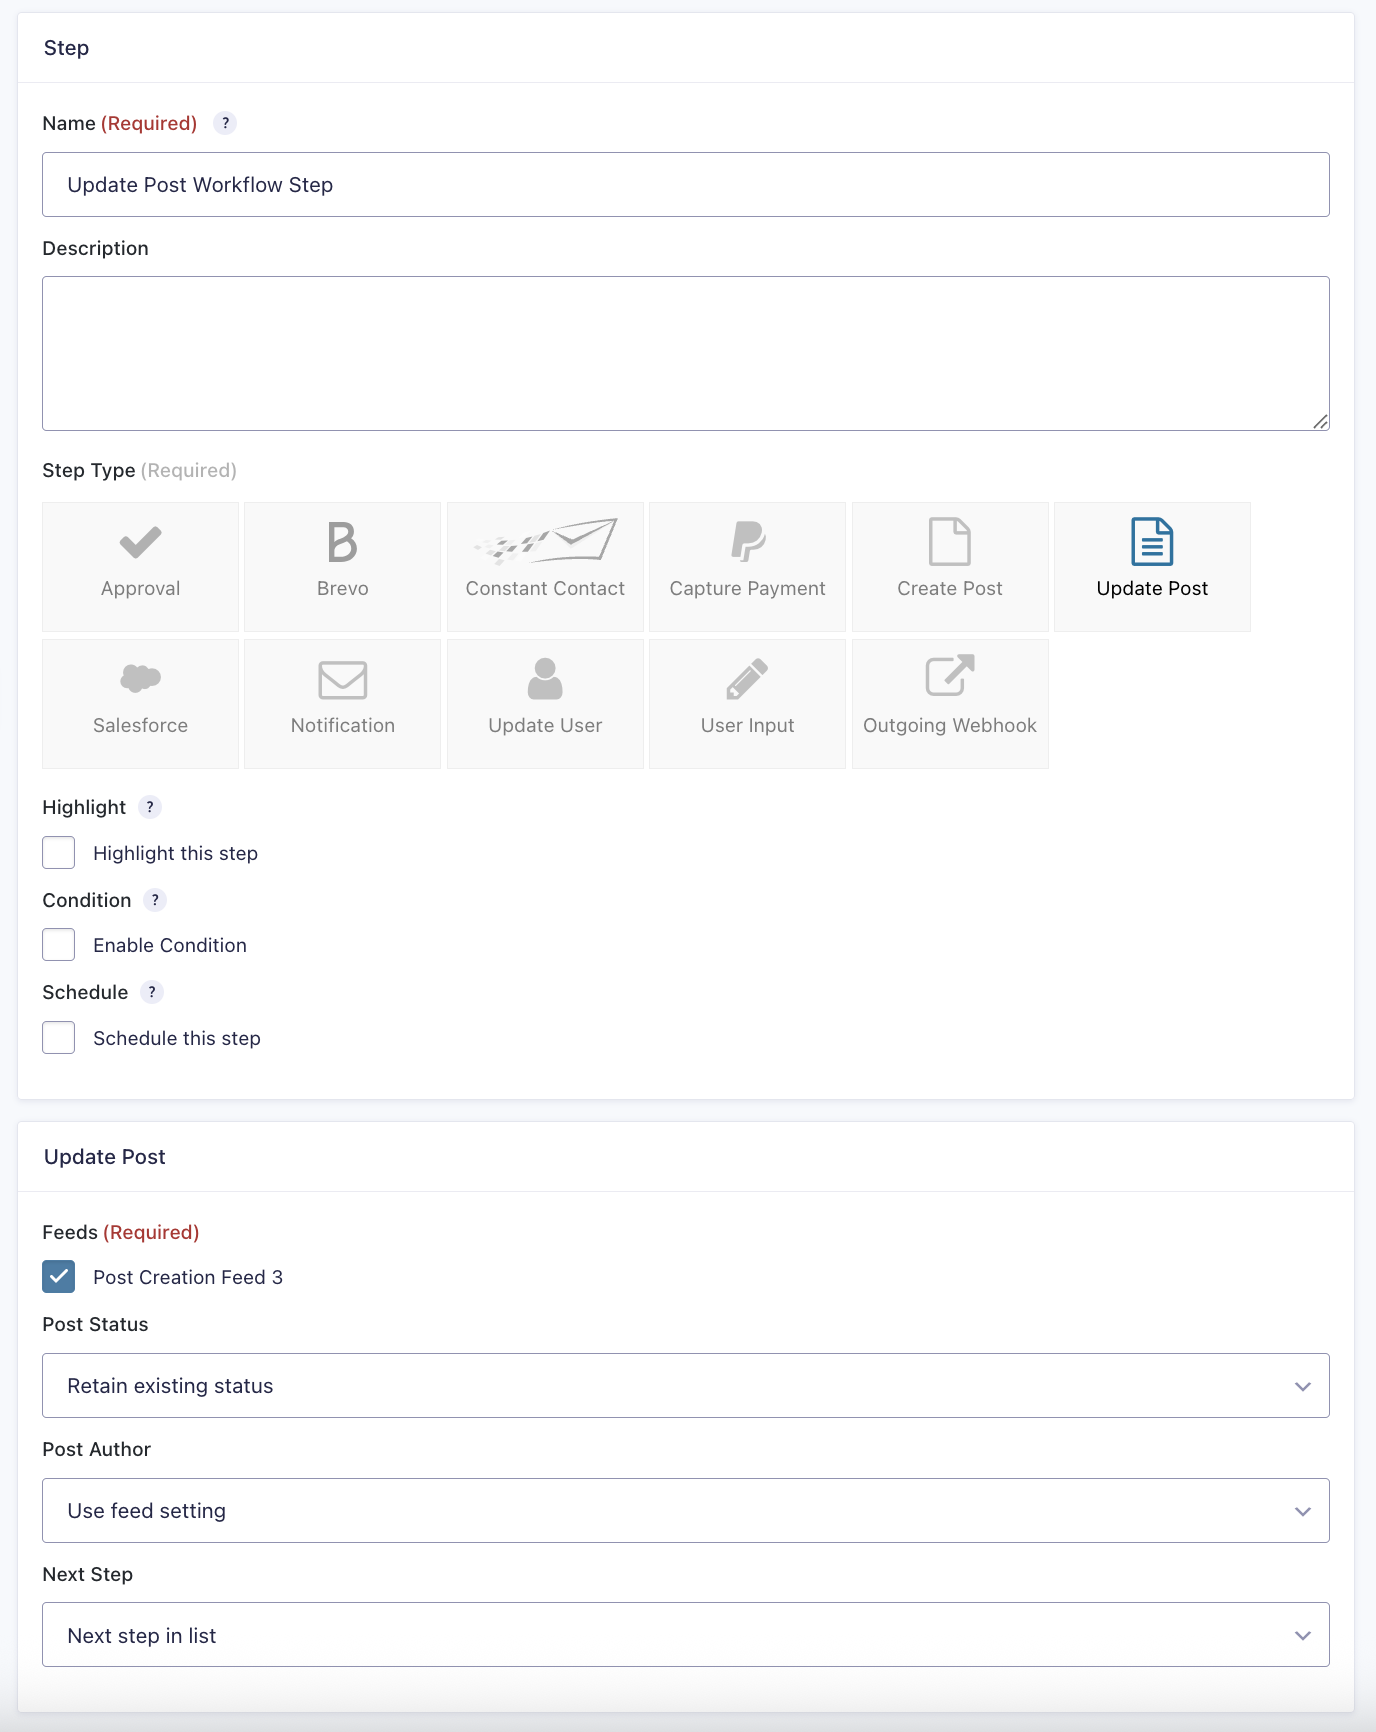
- From the Form Editor screen, navigate to Settings → Workflow.
- Select Add New Step and set a Name for the step.
- Choose the Update Post step as the Step Type.
- Click the Update Step Settings button to save the step.
When the workflow reaches this step in the workflow, it will read in the latest field values from the entry and update the post content and any other settings the APC feed has defined.
| Setting | Description |
|---|---|
| Name | Defines the workflow step name used to identify it within the workflow. Required |
| Description | Provides a short description of what the step does. |
| Step Type | Specifies the type of step to execute. Required |
| Highlight | Highlight this step to visually emphasize it in the workflow. |
| Condition | Enables a condition to determine whether the step will run. |
| Schedule | Configures when this step will execute within the workflow. |
| Advanced Post Creation Feed | Selects the feed to use for post creation. Required |
| Next Step | Defines the next step in the workflow sequence. |
Update Post Step Settings Reference
| Setting | Description |
|---|---|
| Name | Defines the workflow step name used to identify it within the workflow. Required |
| Description | Provides a short description of what the step does. |
| Step Type | Specifies the type of step to execute. Required |
| Highlight | Highlight this step to visually emphasize it in the workflow. |
| Condition | Enables a condition to determine whether the step will run. |
| Schedule | Configures when this step will execute within the workflow. |
| Advanced Post Creation Feed | Selects the feed to use for post creation. Required – Post Status: Defines the post status or defaults to the Feed settings. – Post Author: Defines the post author if the form has a User field or defaults to the Feed settings. |
| Next Step | Defines the next step in the workflow sequence. |
Add a Notification Step
- From the Form Editor screen, navigate to Settings → Workflow.
- Click Add New to create a new step.
- Enter a Name for the step.
Inform Submitter - Enable the Workflow notification.
- Select the Email field in your form as the recipient.
- Enter a subject and message relevant to the post.
- Click Update Step Settings to save the step.

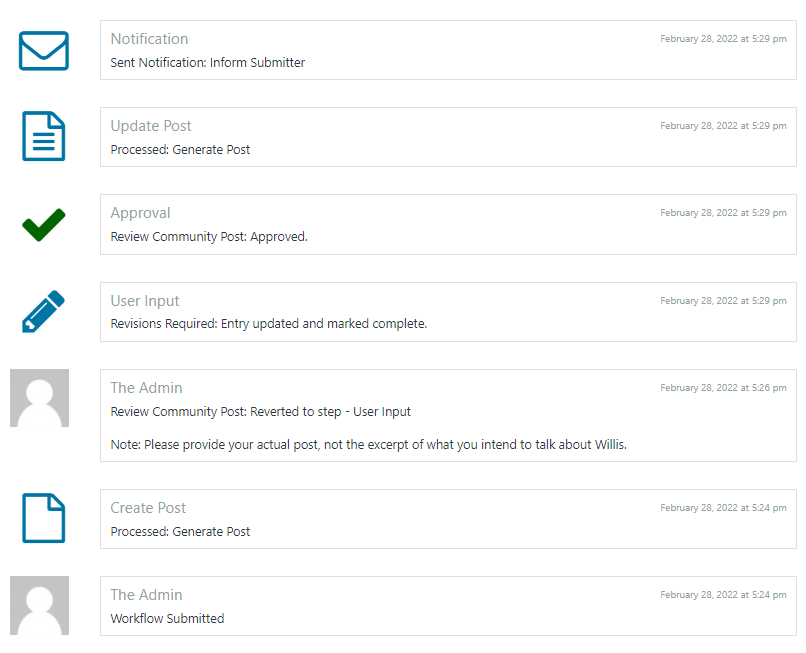
The result is a workflow that will keep your content creation flowing with ease.
And the timeline for the entry shows when each feed or step was actioned.