As of Gravity Flow 2.8, the Gravity Flow Blocks are available within the plugin directly. See Gravity Flow 2.8 Beta release notes for more details.
There are 4 blocks available with Gravity Flow for you to add to your posts, pages and other content areas of your WordPress website.
Learn more about each of them below.
The blocks are designed to work on separate pages within your site. Do not combine multiple Gravity Flow blocks on a post/page because it is not supported and it’s unlikely to work as expected.
The Status Block
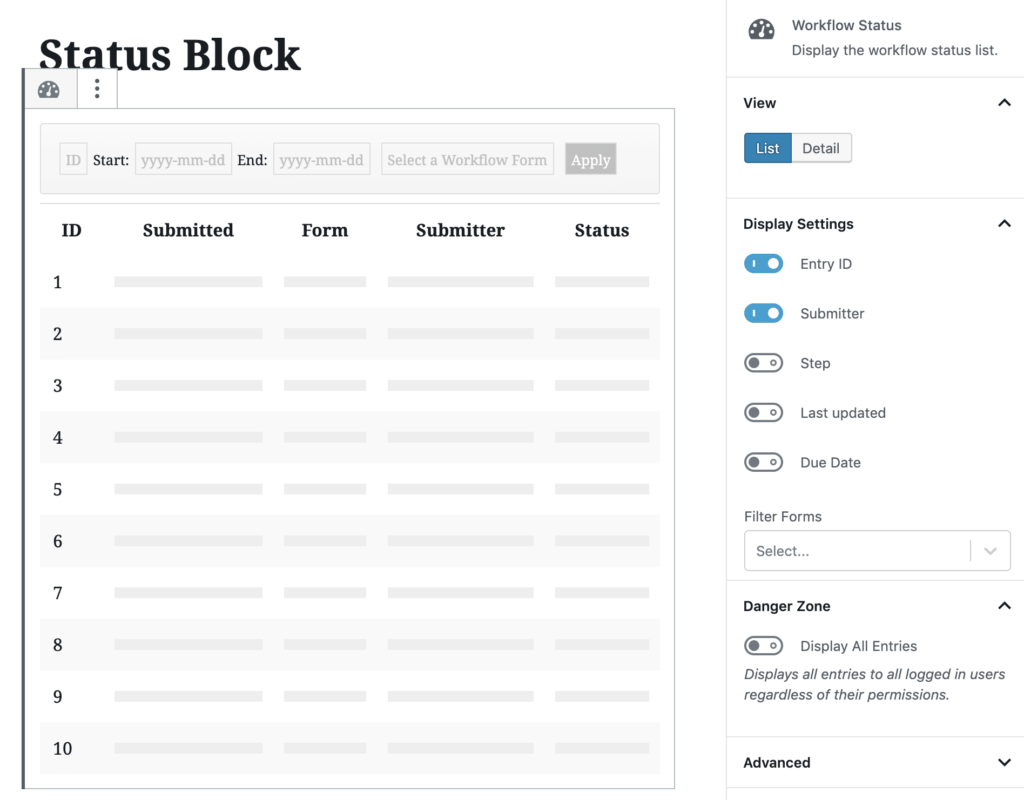
 This block displays the Status page which is the place to find all your submitted Workflows. By default users will only see their own forms. Administrators will see all forms. The Status block does not currently support a live data preview.

The Status Block and Inbox Block both provide settings in relation to two views:
- List View – Showing the user a list of multiple entries with a subset of columns of data about each one.
- Detail View – Showing the user a single entry in more detail. The current step an entry is on in its’ workflow will determine what fields of data are shown while the
Each view has a separate set of display settings to define what the block will/not present to the site visitor.
List View Display Settings
- Entry ID – Whether to show or hide a column for the ID of the entry
- Submitter – Whether to show or hide a column for the name of the user who submitted the entry originally.
- Step – Whether to show or hide the name of the current step an entry is on in its’ workflow. If the entry is complete this column value will be blank.
- Last Updated – Whether to show or hide the date/time that the entry was last updated.
- Filter Form(s) – Provides a select box to limit the entries to be based on a specific form. If you select a single form you can then also define specific fields which should be shown in the list view.
[2.8 Issue preventing completion of this item with screenshots]
Note that the status list can be filtered by multiple forms, however, field values can only be displayed if only one form is selected.
Detail View Display Settings
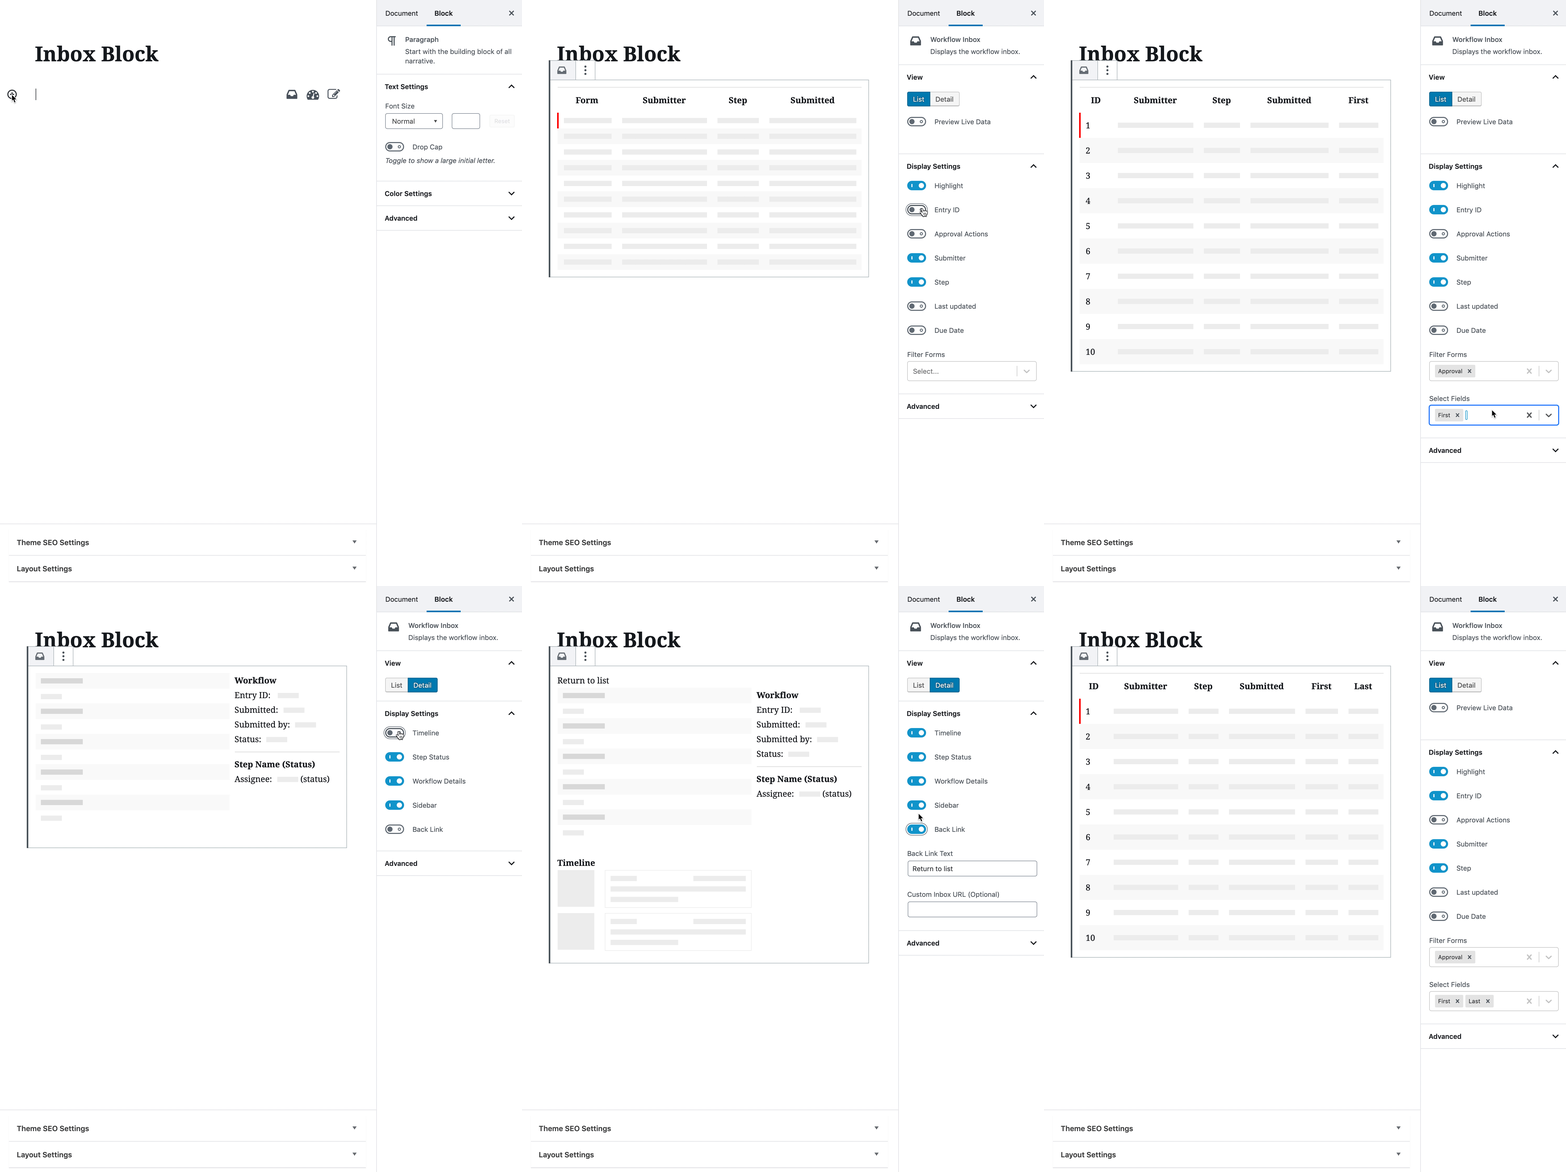
- Timeline – Show or hide the timeline on the entry details screen. The timeline lists who performed what activity or steps up to the point the entry is at in its’ current workflow.

- Step Status – Whether to show the current step, its’ status and assignee(s) as a part of the Workflow Details section.

- Workflow Details – Whether to show the Workflow Details section which contains the entry ID, submitted date, submitter and status.

- Sidebar – Whether the entry details page should display in a 1-column or 2-column layout.

- Back Link – Should to show a link to get from the detail view back to the list view. If this setting is active, two additional sub-settings are presented:
- Back Link Text – Allow you to replace the default ‘Return to list’ text with something more contextually relevant for your website.
- Custom Inbox URL (Optional) – Customize the url to return users to from entry detail page.
Useful if you have multiple pages with different Inbox/Status blocks on them or Gravity Views.
The Inbox Block
 This block displays the Inbox Page which is pre-filtered to entries that the site visitor/user is defined as an assignee to its’ current step. It provides a way to control what appears on the page in both the list and detail views.

In addition to the display settings which the Inbox and Status Block share, the List View of the Inbox has 3 additional settings:
- Highlight – Whether to show the step highlight at the left side of the row if any have been defined in the current step settings.
- Approval Actions – Whether to show a column with options for assignees to bulk approve or reject directly from the inbox without having to open up the workflow detail page.
See the Inbox Page or how to configure an approval process for more details on how to make best use of this setting. - Due Date – Whether to show a column with the due date associated to the current step of each entry if it is defined in the step settings. The selected color will override the highlight if that setting is also active for the block.

The Reports Block
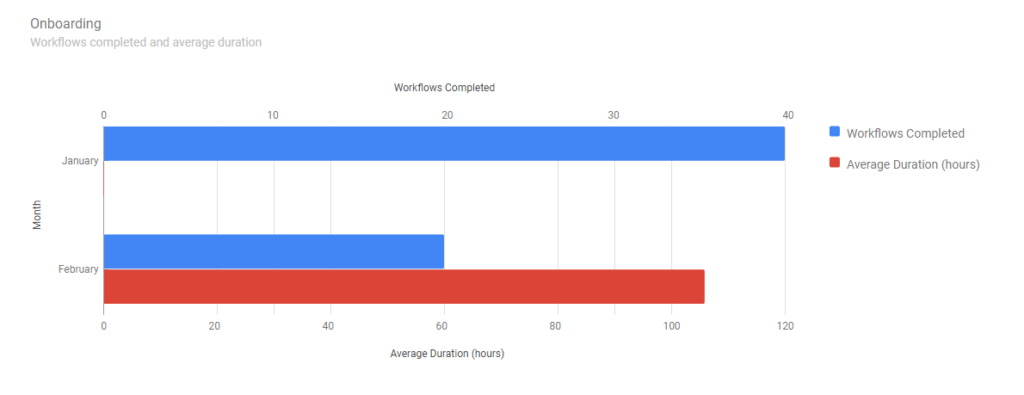
 The Reports block displays reports based on one or more forms which can show a variety of charts for completed workflows and average duration by month, step, and assignee. Their goal is to help you:
- Track on-going performance of your workflows
- Identify potential bottle-necks in your processes – in real time.
An example report that has been pre-filtered to a single form:

Display Settings
The Reports Block provides one display setting – Display Filters – to control whether the site visitor has access to a filter bar which allows them to adjust which forms or data points of them are included in the selected report. Turning this on allows the site visitor to override any defaults you may set in the Filter Settings described below.

![]()
Filter Settings
The block can be pre-filtered to show a subset of the workflow data from your website. At a minimum there are two settings you can set.
- Range – Last 3 Months, Last 6 Months, Last 12 Months
- Filter Forms – When the default ‘Select a Workflow Form’ setting is chosen, all forms will appear as separate bars in the chart.
If you select a specific form, the following additional settings will be available.- Category – Whether to group the report data by Month, Assignee, or Step.
- Assignee – The report data will be grouped by assignee (user, role, or email field) down the y-axis of the chart.

- Month – The report data will be grouped by month down the y-axis of the chart. It could then be further filtered by assignee.

- Step – When the category of Step is chosen, the report data will be grouped by step name down the Y-axis of report for each active step in the workflow.

When the filter includes a specific step, the data grouping will change to the assignee for the selected step down the y-axis.
The most granular combination would combine all 3 filters for step, assignee and month. At which point the y-axis will represent the months in which the assignee completed the specific step of that workflow.
The Submit Block
 The Submit block displays all published workflow forms by default. Workflow forms can be published on the Workflow > Settings page. The list of published forms can be filtered by using the Filter Forms setting in the block settings.
 |  |