
In the first lesson in this Getting Started series – How to design a workflow – we looked at some of the core concepts/terms of Gravity Forms and Flow and built out our swim lane diagram as a process map for what we will be building. This lesson will focus on building the form with all of its fields and the next the workflow with its steps to complement.
Following the entry’s journey
Before we dive into building the form, let’s take a look at how the fields will be experienced from a user perspective through the various steps in the workflow. We will bounce between looking at the swim lane diagram and the different user experiences of each step that we will be building in the next lesson. While it won’t always be a luxury you have when automating your own business process from scratch, we thought it a good way to give you a clear picture for what the end result of following this Getting Started course will be before diving into creating the form and workflow.
Click on the thumbnail to see a larger page / context view in separate image tab
1) Potential customer submits the form
There are only a few fields present on the initial form view. It doesn’t overwhelm them with a wall of fields to submit. Just provide enough information for us to get started.

2) Manager reviews the brief
A simple set of approve/reject buttons let our staff decide how the entry should proceed, or they also have an option to ask for revisions from the customer. We have configured the revise/reject options to require a note which will get included in a notification to the customer.

3) Potential customer clarifies their brief
By simply clicking on one link in an email they are loaded into a page on our website with all of their previous answers pre-populated to edit. They saw our note in their email about requested changes and it is also a part of the timeline below. They can save their modifications multiple times before clicking to complete their step. This revise/review cycle can continue as many times as necessary without your staff writing one email.

4) Manager assigns a designer
Once the Approval step is approved the entry moves on to a new step in the workflow. A different set of fields are visible in this User Input step including a dropdown for our manager to select which designer will take the logo from concept to completion. They don’t have to pick from everyone in the company, the dropdown is pre-filtered based on the designer role.

5) Designer uploads concept art
A different User Input step, a different set of visible/editable fields for a different assignee. We’ve glossed over the hardest part of coming up with the logo design concepts, but once the designer has them ready they can upload to a field that is set to allow multiple file uploads.

6) Customer confirms their preferred concept
Much like the design brief review process, the approval / user input cycle for concepts can take as many iterations as needed. The system stores all of the uploads meaning that the customer always has one spot to access everything they need in the project.

7) Designer uploads the polished logo
After turning the sketch into finished artwork the designer returns to their inbox to upload the final graphic. Since our hypothetical Logo Company is nice, we also will be providing customers with the source artwork. The designer uploads each into a separate field.

8) Final Sign-Off
We all know that every customer accepts the polished design on the first iteration right? In our configured workflow, the customer doesn’t see or have access to the source files until they provide their final approval. This ensures they aren’t accidentally downloading a wrong version.

Adding A New Form
New to Gravity Forms?
Gravity Forms has put together a great series of video tutorials covering the basics of the form editing interface. If you are brand new to both Gravity Forms and Gravity Flow, that might be a good series to check out.
Do you want to follow along on your own?
If you are following along in your Gravity Flow Demo Environment, all of the plugins/extensions you need are already installed and activated for you.
To get started click the Forms > New Form link from the navigation on the left side of the WordPress admin interface.

In the pop-up window enter a Title (required) and Description (optional) for your form.
Then press the Create Form button. We will call ours ‘Getting Started – Logo Design – Simple’

Use the field panels on the right side of the interface to add the fields to your form. You can either click on the field type from the accordion panels to add the field to the bottom of your form or drag and drop the field into a location within your existing forms. Any field you add can be selected to drag and drop to change their position within the form.
Fields for form submission
Let’s first add the fields which we know we want the potential customer to submit on the initial form. Some will be required in order to complete the form and others will be optional.

- Add a Advanced > Name field
- Set the label to ‘Your Name’
- Set the field to be required.
- Add an Advanced > Email field
- Set the label to ‘Your Email’
- Set the field to be required.
- An email field is very useful for cases where the form submitter is not also a user within your WordPress website. You will need to capture it if you want to assign any steps in the workflow to them.
- Add a Standard > Single Line Text field
- Set the label to ‘Company Name’
- Set the field to be required
- Add a Standard > Paragraph field
- Set the label to ‘Design Brief’
- Set the field to be required
- Add a Advanced > File Upload field
- Set the label to ‘Current logo and/or brand materials’
- Set the option to enable multiple file uploads
Fields for workflow steps
Next, we will add the fields that will be used further in the workflow process. To ensure that they are not visible on the initial form submission, for each field listed you will check that under the field editors’ Advanced tab the Visibility is marked as Administrative.
This is more secure than setting them to hidden because they do not show up in the form markup at all when the form is first presented. While you can drag and drop to rearrange the order, we have put them in this way so that when we get to the workflow steps the fields which assignees are going to interact with will show up at the top. You could think of this similar to the ‘Last In / First Out’ accounting concept, although it may not always make sense for your workflow to do so.

- Add a Workflow > User field
- Set the label to ‘Select Designer’
- Set the Users Role filter to Designer.
- Set the field to be required.
- On the Advanced tab, set the Visibility to Administrative.
- Add a Advanced > File Upload field
- Set the label to ‘Concept Sketch(es)’.
- Enable the option for multiple file uploads.
- Set the field to be required.
- On the Advanced tab, set the Visibility to Administrative.
- Add a Advanced > File Upload field
- Set the field label to ‘Final Logo Design’
- Set the field to be required
- On the Advanced tab, set the Visibility to Administrative.
- Use the duplicate feature on the Final Logo Design File Upload field
- Change the field label to ‘Source Artwork’
- Click the Update Button to save all your fields into the form.
Customizing the confirmation
The confirmation defines what message/page the user will see after successfully submitting their form.
In the Form Edit bar select Settings > Confirmation

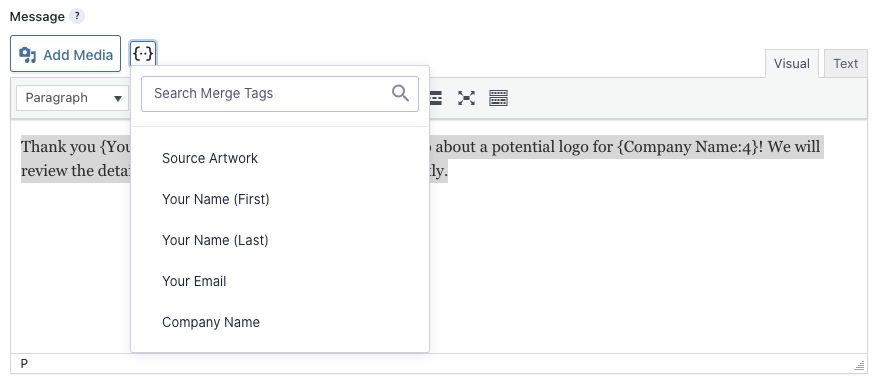
Modify the message box with the following text
“Thank you {Your Name (First):1.3} for contacting Logo Co about a potential logo for {Company Name:4}! We will review the details you have provided and be in touch shortly.”
Why are there so many { }’s in that message?
The { } brackets, and the content inside them, is known as a merge tag. They allow you to dynamically populate submitted field values and other dynamic information in notification emails and many other areas!
The : followed by a number within them represents the Field ID. So {Company Name:4} happened to be the 4th field you added to your form if you followed the order directly by the lesson instructions. You can use the {..} button to select which fields/merge tags you want to add to your notification and it will have the proper field ID within the merge tag for you. For more information, refer to the Gravity Forms Merge Tag guide.
Press the Save Confirmation button
At this point you could use the Form Edit bar to select Preview and see the form in action, but it will not have the same design or placement as your customer would see it within your website. To do that we need to add either a Gravity Forms Block or Shortcode. Follow the instruction set that is appropriate for your environment. If you are following this guide in a Gravity Flow Demo environment you can choose whichever you prefer.
Setup the form submission page via a WordPress Block
Click the Pages > Add New link from the navigation on the left side of the WordPress admin interface. Provide a page Title – Get Your Own Logo Today
Click the + at top of the page to open the block selector. Type Gravity into the search box and select Form

Click the ‘Select a Form’ drop down and pick your saved form titled ‘Getting Started – Logo Design – Simple’. The block will turn into a preview of the form with the non-administrative fields on display. On the right side under Block settings tab turn the Form Title and Description sliders off.

(optionally) Preview your page from the link in the header of the block editor interface.
Publish your page by pressing the Publish button in the upper right corner of the block editor interface.
Go to the page to see it on the front-end of your site with the full theme styling in place.
If you were to submit the form at this point, you will see the confirmation message and the entry will be stored in the website. However, because we have not created any workflow steps for the form, no additional actions will be processed. That is what will be covered in the next lesson in this series.