
Now that we have all our fields on the form we can control what steps a form entry will follow after it is submitted and potentially how the fields of data are modified through that process. Each step type has specific settings that you can customize to define how that step behaves. We are going to explore some of the key settings related to User Input and Approval steps as a part of this guide. Once you have set up a few steps you will likely find it both easy and fast to create workflows with any step type.
Are you building in your onboarding environment or your own website?
All of the example users/roles provided in this demo will match if you are following along in your Gravity Flow onboarding environment. If you are setting this up in your own environment, you will need to adjust a few values, assignees in particular, based upon data in your WordPress site.
Accessing the Workflow Edit Screen

You can access the workflow edit screen in one of two ways.
- From the Form List mouse over the form title and select Settings > Workflow.
- If you already have any of the form specific tabs open select Settings > Workflow
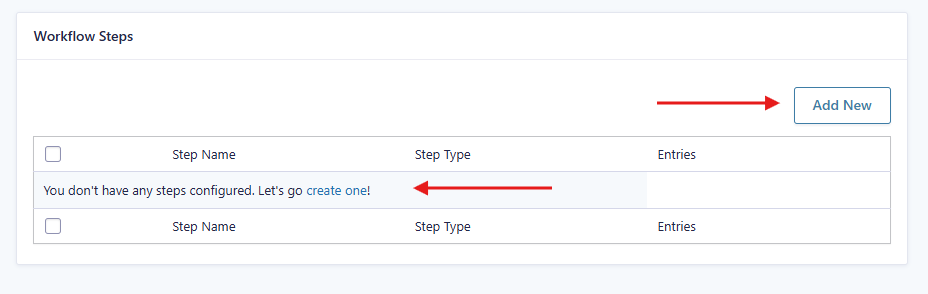
From the Workflow Steps screen you will be able to select the Add New step button from the header, or in the case of a blank workflow also the option via the create one link.
About Step Order and Iteration
This Getting Started series has been working to build its example logo design process from beginning to end in almost literal fashion – all the fields on the form first and now the steps in the workflow. In fact, it’s only in the next guide (From form submission to workflow completion) that we are going into any detail about the Gravity Flow blocks/shortcodes where you would begin to be able to truly test the workflow end-to-end.
A large part of that was possible because of the time spent up front to build out a good process map and think about what fields would be needed at each step. We wanted to highlight the potential time saved that comes with that upfront planning if your project can structure for it. The reality of building most workflows will be a more iterative nature.
- You learn that a field must be added to address a new requirement
- You want to test a small portion of the workflow “end to end” before setting up all steps
- Testing a new workflow leads you to ways you could improve the end user experience
- Your business changes and your business processes will need to adapt along with it
Just as there is never any one right technology for all situations, there is no one right way to build a workflow. We have tried to design Gravity Flow with flexibility in mind towards this. While you are early in your learning process, we encourage you to take a bit of time to explore and find what way(s) feel the most efficient to you. The order that we add the steps in this lesson has been chosen both to introduce settings in an easy to learn order and to reduce the amount of screens you need to work through in building this specific workflow. As you will soon see, there are a number of reasons why step types or settings on a given step are visible (or not) including:
- What field types are in the form
- What other step types are already in the workflow
- What other plugins, Gravity Forms add-ons or Gravity Flow extensions are active
No fitbits required here….Let’s start adding our steps!
Be aware of formatting that your browser may apply when copying/pasting examples
Some web browsers attempts to help you when copying/pasting values into a form field can have adverse effects. One common example of this are quotation marks that can change from a neutral ” (very straight) to an “encoded format” (left and right specific quotation, more curved visually) which Gravity Forms and Flow will parse in a different manner. If you find you are not getting expected results in relation to merge tags, short codes or other snippets that you have copy/pasted from this page, try pasting into a text editor in between browser pages or check closely that the values in your step settings panel match to the examples provided exactly.
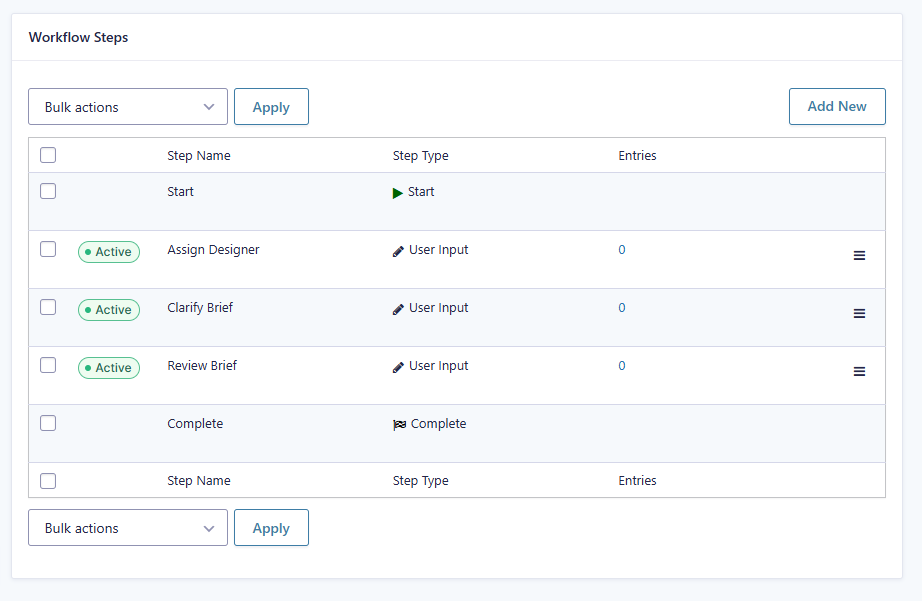
Adding Steps to the Logo Design Workflow
User Input Step – Assign Designer
- Add a new step with the Name ‘Assign Designer’ and a Step Type of User Input
- Scroll the Select Assignees list to the Roles section and click on Manager. It will move into the selected assignee list on the right. By selecting the manager role, it ensures any of our 3 manager users with that role will be able to complete the step. We also could have selected the 3 managers from the user list, but that would mean that if a new manager is added to the system we would have to update the step settings.
- Change the Editable Fields section to include the ‘Select Designer’ field.
- Change the Display Fields setting to ‘Hide all fields except selected’ and select the 5 fields which the customer could submit on the initial form (Your Name, Your Email, Your Company Name, Design Brief, Current logo/branding). The rest of the fields will be empty since they come later in the workflow so it is visual clutter we don’t need to include in this step.
- For our scenario, where we expect our manager to be accessing the site regularly we won’t set up any of the email notifications so the rest of the default settings are okay.
- Press the Update Step Settings button to save the step.
User Input Step – Clarify Brief
- Add a new step with the Name Clarify Brief’ and a Step Type of User Input
- Scroll the Select Assignees list to the Fields section and click on Your Email (which is the name of the field that has an email field type). If our form did not have any email fields that section would not be visible.
- Change the Editable Fields section to include the fields Design Brief and Current Logo/Branding. We’ll assume the customer is not going to spell their name or company wrong, but it is easy to add more editable fields as you like.
- To help the customer know what fields are editable enable the Highlight Editable Fields option and select Green Background.
- Enable the Display Instructions setting and provide a note which will show up above the form to guide the customer in what they must do.
“Please edit your design brief and/or current logo/branding materials so that our designers have a better sense of what you would like to incorporate into your logo design concepts. Press the <strong>Save button </strong>on right side when you are satisfied with your edits.” - Change the Display Fields setting to ‘Hide all fields except selected’ and select the 3 other fields which the customer could submit on the initial form (Your Name, Your Email, Your Company Name’.
- Change the Save Progress setting from Disabled to Submit buttons (Save and Submit). This will let the customer come back and revise their text if they want before the step is submitted back to the manager.
- Activate the Assignee Email option and populate values that will guide the customer
- From Name – Logo Co
- From Email – {admin_email}
This will default to what is setup in your WordPress Administrative Email (Settings > General) via a Gravity Forms merge tag. - Subject – {Company Name:19} Logo Request – Please review brief
Note that all of the field related merge tags and several others are available via the dropdown icon at the right of most fields. - Message
For now, that is all the settings we need. We will be coming back to modify the Next Step option after we create a few more steps.
Press the Update Step Settings button to save the step.
Assignee email message for copy/paste
Hello,
Thank you for submitting your design brief. We have a couple of questions about it before we can assign it to one of our designers to create some concepts for you to review.
{workflow_note}
Please access your request and provide updates to the brief at: {workflow_entry_link: page_id=”8″}
Gravity Flow specific merge tags
We have included 2 Gravity Flow specific merge tags that will get converted into entry specific values when the notification is sent to the email (defined via the assignee setting)
{workflow_note}
If the preceding step (which will be the manager Reviewing the Brief) included a note it will be included in the notification email.
{workflow_entry_link: page_id=”8″}
As the customer does not have a WordPress user with email, we need to generate a unique link (with a secure token) that takes them to a specific page on the front-end of our site that has the [gravityflow page=”inbox”] shortcode on it. We will cover shortcodes in more detail in the next lesson, but on installation Gravity Flow will have created one by default for your site. See linking to the workflow entry for more detail
Approval Step – Review Brief
- Add a new step with the Name Review Brief’ and a Step Type of Approval
- Scroll the Select Assignees list to the Roles section and click on Manager.
- Change the Display Fields setting to ‘Hide all fields except selected’ and select the 5 fields which the customer could submit on the initial form (Your Name, Your Email, Your Company Name, Design Brief, Current logo/branding).
- Enable the Revert to User Input Step and select ‘Clarify Brief’ step.
Had we not set up the User Input step first, this setting would not have been visible. - Activate the Rejection/Approval/Revert emails. They will all have the same delivery details with a different message that you can copy/paste from the appropriate column below
- Send To Select = Your Email Field
- From Name: Logo Co
- From Email: {admin_email}
- Subject: Design Brief for {Company Name:19}
Rejection Email Message
Hello,
Thank you for submitting your design brief about getting a logo designed for {Company Name:19}. Unfortunately, based upon the details in the brief at this time we do not believe we will be able to provide a logo for this request.
{workflow_note}
Regards,
{user:display_name}
Approval Email Message
Hello,
We have reviewed your design brief and everything looks good. One of our top notch designers will be sending you some concept art to review shortly.
Regards,
{user:display_name}
Revert Email Message
Hello,
Thank you for submitting your design brief. We have a couple of questions about it before we can assign it to one of our designers to create some concepts for you to review.
{workflow_note}
Please access your request and provide updates to the brief at: {workflow_entry_link: page_id=”8″}
Regards,
{user:display_name}
- Set the Workflow Note to be ‘Required if reverted or rejected’ so that our designer will know what changes the customer wants to see.
- Modify the Next Step if Approved setting to the Assign Designer step previously created. After we revise the order of the steps in our workflow it will ensure that the Clarify Brief step is skipped in all scenarios except when the Manager choses Revise on this step. See our docs on Workflow Branches for more in-depth details about this.
- Press the Update Step Settings button to save the step.
Adjusting Step Order
If we review the order of steps that we have setup in comparison to the order of our plan, we will see that they do not match. That is okay, because Gravity Flow makes it very easy to adjust the order by clicking on the ![]() icon and dragging from each step in the workflow list to its preferred placement. The ‘Next Step’ settings we defined will also adjust how the entry proceeds through each potential step based upon the action the assignees take as we have shown here after adjusting the step order.
icon and dragging from each step in the workflow list to its preferred placement. The ‘Next Step’ settings we defined will also adjust how the entry proceeds through each potential step based upon the action the assignees take as we have shown here after adjusting the step order.
Before
After

The one setting we haven’t adjusted is to ensure the Clarify Brief step leads the entry back to the Review Brief step. Click on the Clarify Brief step, scroll down to the Next Step setting and change it from Next Step in List to Review Brief.
The rest of this guide adds an additional 5 steps into the workflow. Although, stopping here to go to the next lesson – From form submission to workflow completion – might be a good idea for a few reasons:

- The 4 steps that we have setup combine to represent a series of conditional flows and user interactions that can be thought of as one larger function – getting an approved brief with a designer assigned.
- There is enough in that – both from user role and screen interaction – that you are probably wanting to see/test the experience end-to-end before moving on to the additional steps. We have not yet covered how the front-end page(s) are set up to allow the customer to submit their user input steps without a WordPress user so you can’t test this portion end-to-end. That is what we will cover in the next lesson.
- The other larger functional groupings of steps (create/approve concept designs and create/approve final artwork) have a similar set up process.
User Input Step – Prepare Sketch
- Add a new step with the Name ‘Prepare Sketch’ and a Step Type of User Input
- Set the Select Assignees list to the Select Designer field.
- Set the Editable FIelds list to Concept Sketch(es) field.
- Enable the Display Instructions setting and provide note
Review their materials and come up with something awesome. Scan your concept sketches and attach in the Concept Sketch(es) field.
- Set the Display Fields setting to Display all fields except selected
– Select Designer
– Final Logo Design
– Source Artwork files - Disable the Email for Assignee as our designer will be accessing their inbox regularly.
- Press the Update Step Settings button to save the step.
Approval Step – Confirm Concept
- Add a new step with the Name Confirm Concept’ and a Step Type of Approval
- Set the Select Assignees list to the Your Email field.
- Set the Display Fields setting to Display all fields except selected
- Select Designer
- Final Logo Design
- Source Artwork files
- Activate the Assignee Email option and populate values that will guide the customer
- From Name – Logo Co
- From Email – {admin_email}
Subject – {Company Name:19} Logo Concept Sketches
Confirm Concept Assignee Message
Your concept sketches are ready!
{workflow_entry_link: page_id=”8″ text=”Please access your request to approve/reject and provide any feedback to the designer so that they can turn it into your finished logo.”}
Regards,
{user:display_name}
- Set the Reminder to resent after 5 days and repeat every 2 days.
- Set the Workflow Note setting to Required if Rejected.
- Set the Next Step if Rejected setting to Prepare Sketch.
- Press the Update Step Settings button to save the step.
User Input Step – Polish Concept
This step is very similar to the Prepare Sketch step which makes it a good one to duplicate.
- Mouse over the Prepare Sketch step title and press the Duplicate button.
- Click on the new Prepare Sketch step that is added to the bottom of the list.
- Change the step title to Polish Concept.
- Change the Editable Fields setting to Final Logo Design and Source Artwork Files.
- Disable the Display Instructions setting.
- Press the Update Step Settings button to save the step.
Approval Step – Final Sign-Off
This step is very similar to the Confirm Concept step which makes it a good one to duplicate.
- Mouse over the Confirm Concept step title and press the Duplicate button.
- Click on the new Confirm Concept step that is added to the bottom of the list.
- Change the step title to Final Sign-Off.
- Change the Assignee Email Subject to {Company Name:19} Logo Final Sign-Off.
Final Sign-Off Assignee Message
Your logo is ready. Check it out!
<img src=”{Final Logo Design:11}”/>
{workflow_entry_link: page_id=”8″ text=”Please access your request to approve/reject the final design”}
All of the digital/scalable versions of the artwork will be emailed to you after sign-off.
It has been a pleasure working for you.
- Change the Next Step if Rejected setting to Polish Concept.
- Press the Update Step Settings button to save the step.
Notification Step – Deliver Digital Assets
- Add a new step with the Name ‘Deliver Digital Assets’ and a Step Type of Notification
- Set the Select Assignees list to the Your Email field.
- Set the From Name list to Logo Co
- Set the Subject to
{Your Company Name:19} – Your completed logo is ready
Deliver Digital Assets Notification Message
Thanks for the opportunity to work with you. You can now either:
<ul>
<li><a href=”{Final Logo Design:11}”>Download Final Logo</a></li>
<li><a href=”{Source Artwork File:17}”>Download Source Artwork</a></li>
</ul>
Please feel free to recommend our service to all your friends.
- Press the Update Step Settings button to save the step.