

Step Purpose
The Approval step is all about asking your potential assignees a yes/no question in relation to data that has been provided in the entry. It is meant to provide a fork in the road for the assignees to make a decision. How you configure the Approval step settings will determine what happens after they make that choice.
Depending on your use-case, you might want to frame that choice as a positive/negative, as correct/wrong, as proceed/stop, as agree/disagree or any other business-specific terminology. This doc we will only be using the default terms of approve/revert/reject. but keep in mind that those terms can be easily customized via filters (approve, revert, reject) to fit terminology appropriate to your business or this specific workflow.
Step Settings Reference
An Approval step type can define the following settings in addition to the common step settings all step types have.
| Setting | Summary |
|---|---|
| Assign To | Define who the step will be assigned to and what fields of data they can modify when they access the entry detail screen. |
| Assignee Policy | Define how many assignees have to submit the step before it is completed. |
| Instructions | Provide tips to guide assignee(s) on how best to complete the step. |
| Display Fields | Define what field(s) assignees can see, but not edit, on the current step. |
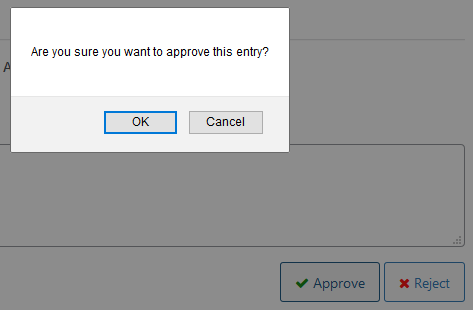
| Require Confirmation | Require a browser-based confirmation by the assignee before their approval/rejection is submitted. |
| Revert to User Input step | When the workflow has at least one User Input step, this setting will provide assignees a 3rd option in addition to Approve and Reject. |
| Emails | Configure notifications sent to assignee(s) when the entry reaches the step or at other points during its’ completion. |
| Workflow Note | Define whether assignee(s) can/must provide a note along with submitting the step. |
| Approval Confirmation | Define a message the assignee will see after approving the entry. |
| Reverted Confirmation | Define a message the assignee will see after reverting the entry. |
| Rejection Confirmation | Define a message the assignee will see after rejecting the entry. |
| Invalid Approval Link Message | Display a custom message when the entry is no longer on this step. |
| Due date | Define due dates for the step that entries will be highlighted based on. |
| Expiration | Enable the expiration setting to allow entries to stop waiting for assignees to complete the step when a certain date/time has passed. |
Step Settings Details
Assign To
The two assignment types – Select and Conditional Routing – encompass a collection of settings that lets you define who the step will be assigned to and what fields of data they can modify when they access the entry detail screen. You will quickly note that there is a strong similarity to the Send To settings of the Notification step type Workflow Notifications setting.
Select
In this assignment type, you can use the multi-select field to define which individual users, roles within your site, or email fields should be able to complete the step. In each case, they will all have access to the same set of editable fields which you select for them. If you select a user and their role, when they submit the step it will consider both the user and role assignees as having completed the step. Only the fields which you select as editable will have inputs on the form for the assignee – the rest are equivalent to having set the fields as administrative display on the initial form.
Conditional Routing
In this assignment type, you can also define multiple assignees but with the added flexibility to control which fields are editable per assignee and conditional logic to determine if/when they should be considered an assignee. The condition settings follow the standard for Gravity Forms:
- Field/Data – What field (or entry data) should be considered?
- Operator – How should that field/data be considered?
- Value – What should the field/data be compared against?
Note that because the conditional routing is value based, it is possible for you to set up rules where a step would have no potential assignees meet their condition and the step be skipped. In this case, the timeline will indicate the step was bypassed due to no assignees.


Regardless of which assignment type you chose, the entry detail screen workflow box will identify the assignee(s) if it is configured for display on the inbox/status view.
Extra considerations regarding email field assignees
An assignee based on an email field allows users without a WordPress user account to participate in a workflow. As email field assignees can’t log in, they can’t use the admin UI, so you’ll need to add the inbox block or shortcode to a page and use the {workflow_entry_link} or {workflow_entry_url} merge tag in the assignee email. If this is a feature of Gravity Flow you intend to use frequently, we recommend you review this user guide related to assigning steps to an email field.
If the workflow scenario you are building involves an email address which is provided in a field and is associated with a WordPress user, we strongly recommend that you use the user selection in your assignee setting. It reduces the risk that the user is logged in when clicking on the tokenized link and doesn’t see the expected entry. When creating form/workflow settings with email fields, we recommend that you use a separate browser in private/incognito mode to reduce the risk of this issue when testing.
Approval Policy
If you think of the Assign To settings as being focused on who can access the step and which fields they can edit on it, the assignee policy determines how many assignees have to submit the step before it is considered complete. It has two options:
Only one assignee is required to complete the step
Whoever is the first to submit which passes all field validation leads to the step being marked complete and moving to the next in the workflow. Their activity will be noted in the timeline. Any assignees who click a link from an email notification after this point will receive an indication the entry is no longer available to edit on that step.

All assignees must complete this step
For every individual user assigned, one user of every role assigned and each email field assigned must complete their user input step in order for the workflow to proceed to the next step.
This is very useful when you want to make sure an entire team has a chance to modify the entry, but If the any/all options are not sufficient for your approval scenarios, the gravityflow_step_status_evaluation_approval filter allows you to customize for more advanced scenarios such as:
– A minimum number of approvals or rejections
– A certain % of assignees approving or rejecting
– Weighting certain assignee(s) or role(s) as having more value in a calculation
Instructions
When enabled, this will present a specific message you define. You might provide tips to help guide the assignee(s) on what to focus for completing the step, or use some of the Gravity Forms merge tags to reference other fields of data or link to more support materials if the business task the step is accomplishing has additional factors to consider.
Display Fields
While an approval step can let assignee(s) make edits to selected fields along with their decision, the most common use cases involves only letting them see specific fields of data to provide support information to make their decision. The Display Field settings provide 3 different approaches to support both small and complex forms.
- Display all fields
Any field which has not been defined as editable will also be displayed. This includes any with their visibility set to Hidden or Administrative. - Display all fields except selected
Allows you to define a subset of fields which should NOT be displayed. - Hide all fields except selected
Allows you to define a subset of fields which are the only ones that should be displayed in addition to editable fields.
In a workflow that has many steps or many fields, the display fields setting is valuable to control what the assignee(s) see, helping them to focus on the particular task of this approval step. It also reduces the size of the page/form markup that can have help the perceived performance of your site.
Require Confirmation
Activate this setting to display an additional browser prompt for the assignee to confirm before their approval/rejection is submitted. This is especially useful for scenarios involving high value activities or the act of approval (or rejection) that leads to subsequent workflow steps triggering email notifications or integration with resources outside your organization. The confirmation prompt could save your business from very expensive typos.
Revert to User Input Step
This setting is only active if your workflow has already configured a User Input step.
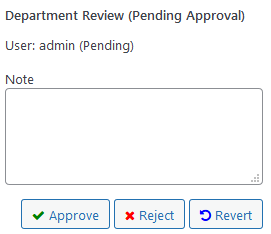
The Revert setting enables a third option in addition to Approve and Reject which allows the assignee to send the entry directly to a User Input step bypassing the approval policy that might await other assignee(s) choices.
Enable this setting to show the Revert button next to the Approve and Reject buttons and specify the User Input step the entry will be sent to. It
The revert label can also be customized in the same way that the approve/reject labels can be with its own filter gravityflow_revert_label_workflow_detail
Emails
As much as we all might strive for inbox zero and want to reduce the amount of messages which our websites send to staff, colleagues or customers, there are many cases where that extra email prompt is essential to ensuring a process is completed in a timely manner. If you have setup any notifications with Gravity Forms to follow the initial form submission, the sub settings for defining emails for Gravity Flow will be very familiar including the use of the {…} button to populate dynamic values via merge tags.
The key difference is that the step email section includes multiple tabs which associate to when a particular email should be sent and in some cases additional controls to define who the message should be sent to.
Assignee Email
When enabled, this setting will send an email to each of the assignees as soon as the entry has been assigned for approval. When assignee(s) within a workflow do not access the site on a regular basis, it is important to enable this setting to notify assignees of the entry that requires their attention/action.
Setting Notes
- A reminder about reminders: In addition to the common notification settings described below, the assignee email has a ‘Send Reminder’ setting. It can be used to re-send the assignee email X days after the step is started and then an option for the same reminder to go out every Y days thereafter. A common setup might be to have it sent after 7 days and then remind every 2 days thereafter.
- If a role is configured to receive emails then all the users with that role will receive the assignee email.
- If you have any assignees who cannot access the workflow user UI (e.g. emails gathered from email fields in the form) use the {workflow_entry_link} or {workflow_entry_url} merge tag in the assignee email. This notification will send them a unique URL which they will use to access the workflow. Use the page_id to specify the ID of the WordPress page containing the inbox shortcode. You can find the ID of the page in the URL when you open the page for editing (it’s the post_id parameter). The text attribute is optional.
- The assignee emails can also include one-click approve/reject links via the {…} merge tags section of the message to allow your users to make their approve/reject choice based solely on which link they click in their email client.
Approval and Rejection Emails
Either the approval notification or rejection notification will be sent once the assignee(s) have made their decisions which meet the criteria of the approval policy. Unlike the assignee email that is predetermined, you can configure these tabs to send to one (or more) recipients opening up a variety of use cases beyond direct notification of the entry submitter.
Revert Email (optional)
If you have defined the Revert to User Input Step setting, this tab will be available to define a custom message to send to the assignee of the user input step. It will replace the default assignee message of the user input step allowing you to create some very flexible review/edit patterns. Whereas the Initial User Input step notification might ask the user to provide details to start their application, the revert message superseding it could be tailored to indicate that changes are needed and include the {workflow_note} merge tag so the assignee can identify what specifically needs to change.
Workflow Note
If enabled, the Workflow Note field will display as a part of the workflow box on the entry detail screen. In the settings’ default ‘Not Required’ state it provides an optional place for assignee to provide general notes about the entry/task. Aside from the hidden option, which removes the note from display, the remaining setting options will ensure that the assignee must complete the note depending on the chosen scenario. If text is entered in the Note box it will be added to the timeline.
Populating a workflow note

When a required note was not provided


Approval Confirmation
Display a custom confirmation message to be seen when an assignee approves the entry.
The default message is ‘Entry Approved’.
Reverted Confirmation
This setting is only active if your workflow has already configured a User Input step.
Display a custom confirmation message to be seen when an assignee reverts the entry.
The default message is ‘Entry Reverted’.
Rejection Confirmation
Display a custom confirmation message to be seen when an assignee rejects the entry.
The default message is ‘Entry Rejected’.
Invalid Approval Link Message
Display a custom message when the entry is no longer on this step.
The default message is ‘This link is no longer valid.’
Due date
Enable the due date setting to allow entries to be highlighted when they have passed their due dates. An optional column can be set on the inbox / status page to display this value. When enabled, you can specify the due date relative to one of 3 approaches just like the step condition setting.
- Delay – Specify a due date relative to the the start of the step
- Date – The due date would be the date you select
- Date Field – If a date field exists on the form specify a due date relative to the field value.
Expiration

Enable the expiration setting to allow entries to stop waiting for assignees to complete the step when a certain date/time has passed. When enabled, the expiration date/time will show as a part of the workflow details box if it is active on your entry details page. You can specify the expiration date relative to one of 3 approaches just like the step condition setting.
- Date Field – If a date field exists on the form specify an expiration relative to the field value.
- Delay – Specify an expiration relative to the the start of the step
- Date – Specify the date would like to expire the entry on.
Next Step
As the Approval Step can have two results – approved or rejected – there are two options to select where the workflow should go in each case. In both cases, the options you can select from are:
- Next step in list
Choosing this will let the entry proceed to the next step as defined in the workflow settings screen. This is advantageous because it means any changes you make to the order of steps (by dragging and dropping on the workflow settings panel) will not require making additional changes to the next step setting. - Workflow Complete
No matter where the step is within the step list, the workflow will be marked as complete and no further steps executed. This is useful when a branch you have designed into the workflow has no further processing requirements. - Send to a specific step
The rest of the dropdown is populated with all of the steps in the workflow except the step you are currently editing. By selecting a separate step you can create a useful loop or break out of a loop when combined with the Condition step setting.
Pay particular attention when using the specific step selection as it is possible to create a circular loop in which an entry will never be able to get to a workflow complete state as a result.
One Click Approval Links
Earlier, we touched briefly on some of the merge tags specific to the approval step assignee email that enable one-click approval or rejection. This is a powerful feature that is worth spending a few minutes on given how much of a difference setting them up can have on the end user experience.
These one-click approval links, and the secure tokens it includes in the generated url, allow approvers to approve or reject an entry directly from an email without having to open the Workflow Detail page if you have set up an inbox shortcode. Links to the default admin inbox do require authentication, but the user will not be prompted to login assuming they have chosen the ‘Remember me’ option from WordPress login screen to stay signed in to the browser. One click links to a page on the front-end with the inbox shortcode do not require login. The potential merge tags in each case to add to the assignee email would look like this:
| Choice | Admin Screen Based | Page/Shortcode Based |
| Approve | {workflow_approve_link} | {workflow_approve_link:page_id=12345} |
| Reject | {workflow_reject_link} | {workflow_reject_link:page_id=12345} |
You would replace the 12345 with the ID of the page that has the inbox shortcode on it. You can find the page ID in the URL of the page when you’re editing the WordPress page. The page ID is the ‘post’ parameter in the URL.
In all cases, the links will expire after 48 hours or an amount of time you set via the gravityflow_[type]_token_expiration_days filter. For more details on their setup and answers to potential security related questions you might have, visit the support doc related to one click approval links
Example Use Cases
Consider different forms that only use approval step(s) and see how different the user experience can be based on the way in which we define the settings.
Training / Course registration
An employee submits a request to take an internal training which requires manager approval.
- Assignee: Use conditional routing to have one assign, the manager, based on the department of the employee. Using dynamic population of a dropdown field so the employee doesn’t even have to select their department.
- Instructions: Remind the manager what things need to be confirmed (team training budget, covering staff schedules, previous employee training requests).
- Workflow Note: Set to required if rejected to document the rationale for it.
- Emails:
- Use the {workflow_note} in the rejection email to inform the employee why their request was not approved.
- Have the approval notification go to both the employee and the resource that leads the training.
If there were a financial cost to the registration, a Stripe payment step could be used within the same workflow, or Form Connector Create an Entry step to use a separate payments form with either being conditional upon approval.
Peer Review Essays
In an educational context, being able to ensure anonymity for review processes that involve certification or grants is key. So is tracking that everyone or enough reviews happen within a set time period. Each round of a review could be handled by its’ own approval step.
- Assignee(s):
Adding multiple users based on a specific role or through a multiple user field which has visibility set to administrative to control who is assigned in each round. - Approval Policy:
Set to all assignees must complete this step. - Display Fields:
Limit to just the paragraph for file upload field where the essay is included. - Emails:
For the assignee email by using the one click approval/rejection links along with merge tags for fields that match to display fields, the assignee would be able to perform their review by one click from their email. If you want to ensure they didn’t accidentally click the wrong link, turn on the Require Confirmation setting.
Using the ‘Send Reminder’ setting to wait 2 weeks and then remind them every 5 days will encourage completion. The reminders only send out to assignees that have yet to complete their decision. - Due Date:
If assignees have a lot of different essay cycles to review, adding the due date to their inbox will help them see when they must complete their task. - Expiration:
Using a hidden date field in the application can let each step define a relative expiration (+3 weeks from it) or you can use fixed dates for an annual activity. Either way, a small number of reviewers not completing their step task does not have to become a bottleneck to the entire process.
For more complex review scenarios than ALL or ANY on the assignee policy there are lots of ways you could approach it such as:
- Use gravityflow_step_status_evaluation_approval to create more granular logic
- An additional approval step for a single resource to aggregate the evaluation results. By giving them a small number of editable fields, they can put in the appropriate tallied results.
- Use the Form Connector Form Submission step so that each evaluation is its’ own entry. Then, using gravityflow_step_is_condition_met to have subsequent notification steps communicate results.
Combining Approval steps with User Input steps can create some fantastic feedback loops.