
Step Purpose

The Outgoing Webhook step is all sending a request to another system, possibly providing entry data to that system or receiving data to map back into the entry.
What makes webhooks so useful is that they allow apps and websites to exchange information following a consistent structure regardless of how, where, when or by whom the system was built. Every system will expect different data and have different naming conventions they expect a webhook to provide. But, provided you have appropriate access/credentials and a few key details from the site/software vendor documentation in order to populate the settings in an outgoing webhook step, Gravity Flow will ensure the required data will be sent in the expected structure to the desired system at the appropriate point in the workflow. No coding knowledge required on your part!
If you are not familiar with what a webhook is, Zapier has written an excellent overview article about webhooks. Iit even uses Gravity Forms as part of their example request. Their techno-jargon free summary of a webhook is that, “Webhooks are one way that [websites or] apps can send automated messages or information to other [websites or] apps. They are a simple way your online accounts can speak to each other and get notified automatically when something new happens.”
Do not worry if the documentation from your vendor/REST API (Application Programming Interface) does not include details for all of the step settings, the Validating/Troubleshooting Requests section covers methods/tools to help you get things connected properly.
Step Settings Reference
An Outgoing Webhook step type can define the following settings in addition to the common step settings all step types have. There are additional sub-settings available beyond this reference table which are described in more detail below. Which of the following settings you select will determine whether those sub-settings are displayed/required or not.
| Setting | Summary |
|---|---|
| Outgoing Webhook URL | The combination of the base URL where the API is hosted along with any endpoint (path) that details where the webhook/API expects you to send the request to. |
| Request Method | Define which of the 5 HTTP methods (GET, POST, PUT, PATCH, DELETE) should be performed by at the webhook url. |
| Request Authentication Type | Whether your request endpoint requires authentication. Gravity Flow supports 3 authentication types: none, basic, connected app/oAuth1. |
| Request Headers | Provide additional request headers about either the resource to be fetched, the client requesting the resource or the structure of the content in the request body. |
| Request Body | Either via field select or raw request (depending on request method) you can provide additional data into the request body for the webhook to use. |
| Response Mapping | Allows data that some API endpoints provide in response to map back to update the entry. Settings exist to map from both Response Headers or Response Body. |
| Next Steps | Allows you to define where the workflow should proceed depending on the response code returned. – Success (HTTP 200-299) – Client Error (HTTP 400-499) – Server Error (HTTP 500-599) – Other Error (Any other response code) |
Step Settings Details
Outgoing Webhook URL
This is the combination of the base URL where the API is hosted along with any endpoint (path) that details where the webhook/API expects you to send the request to. If the endpoint portion requires dynamic data from your entry, the {..} button will allow you to add in a dynamic merge tag.
So if your Webhook URL setting was set up with a merge tag as https://example.com/api/product/{Category:1} and the value in Field #1 for that entry was ‘books’, when the workflow step executes Gravity Flow would make outgoing request to https://example.com/api/product/books/
Request Method
One of 5 options (GET, POST, PUT, PATCH, DELETE) that represent the desired action to be performed by the webhook url. GET and POST are the most common options with it generally being the case that GET is meant to retrieve data from the API while POST is meant to lead to creating/updating data on the API’s system. The request method you specify will determine which of the following settings are available related to mapping request data:
- DELETE – No additional settings
- GET – Request Field Values settings
- POST/PUT/PATCH – Request Body settings and possibly Request Field Values
What/how you populate each of these settings is explored further below.
Request Authentication Type
The outgoing webhook step type supports 3 authentication types that you chose from its initial drop down.
None
An unauthenticated API request. APIs that provide unauthenticated endpoints are generally providing public data or that which has minimal user-specific details.
Basic
When you select this authentication type two additional sub settings for username and password will become available. The API vendor would provide you with a username/password that you would populate into these subsetting fields. When your webhook step is processed in the workflow Gravity Flow will encode the username and password into the request authorization header which the API will validate in order to proceed to processing the rest of your webhook request.
Connected App
You can set up a connected app under the separate admin screen Workflow → Settings → Connected Apps page. Once completed, this sub-setting will let you select that Connected App. Gravity Flow supports OAuth1 connected apps via either the WordPress OAuth1 server plugin or the Gravity Forms API with version 2.4+. That setup of oAuth apps is beyond the scope of this lesson, but you can refer to further support docs related to it.
Request Headers
HTTP request headers let the client – your website – provide additional information within the request about either the resource to be fetched, the client requesting the resource or the structure of the content in the request body. Gravity Flow will automatically provide some headers based on the other settings you specify such as:
- Selecting basic authentication provides the authorization header
- A POST request in JSON format provides the Content-Type header ‘application/json’.
If your API requires additional headers, you can specify as many as required via the rows in the table.
- Name column provides a dropdown that has most standard headers along with an ‘Add Custom Key’ option.
- Value column includes a dropdown of form fields, entry properties or meta which would be dynamically replaced at time of step execution. It also includes an ‘Add Custom Value’ option to build your own as needed.
Request Body
Only displays when your request method is POST, PUT or PATCH.
This setting provides two options that provide you with equally flexible ways to define the body of your request.
Raw request
When selecting this setting, the raw body input field is also displayed and a request header “content-type:application/json” is added to your outgoing request. In the raw body input field you will populate the exact JSON structure you require – likely making regular use of the merge tag {..} button to pull in the field/entry related values to populate the key/value pairs.
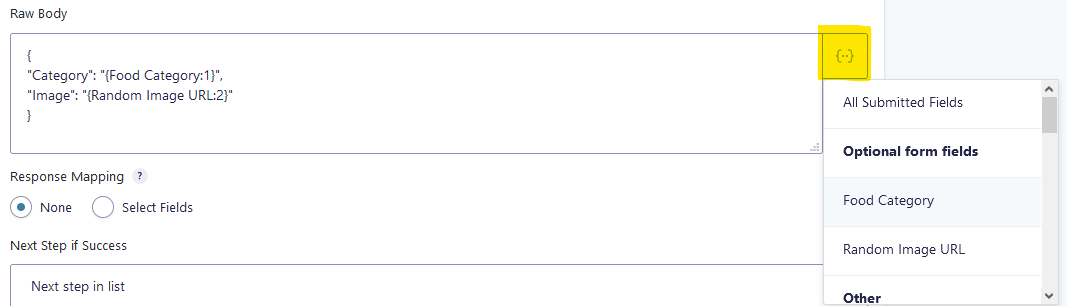
This option will be of most use if your API requires a nested/multi-level body.
Select Fields
When selecting this setting, the Format and Body Content settings are also displayed.
- Format
Presents two options (JSON, FORM) that determines whether your outgoing request body will be sent as a JSON object with associated content-type header or encoded as multipart/form-data. - Body Content
Presents two options that determine what volume of data will be passed in your request body.- All Fields includes key/value pairs for not only the field values, but any entry meta and properties which can be very useful for debugging how an entry changes over time.
- Select Fields will be more commonly used as it lets you define the key names (to map to your API requirements) and only select the field/meta/properties which are required by the API.
Example Request With Body Content of All Fields

Example Request With Body Content of Select Fields
Request Field Values
Displays in 2 scenarios:
- When your request method is GET
- When your request method is POST plus both Request Body and Body Content settings are set to Select Fields.
This setting allows you to define as many key/value pairs of data in its table as your API requires that will be displayed in different areas based on the request method chosen:
- GET
Data will be converted into the query string appended to the URL you specified in the Webhook URL setting. - POST
Data will be converted into the request body based on your Format setting.
In both cases, you can add as many rows as required with each row having columns for:
- Key
A blank text that you will populate based on details provided by your API - Value
A dropdown that you can select from form fields, entry properties and meta OR the ‘Add Custom Value’ option to build a unique value based on merge tags and text.
Response Mapping – Header and Body
All of the settings up to this point relate to how your request will be structured when the webhook is sent to the Outgoing Webhook URL. Some API endpoints will also provide data back as a part of the response which Gravity Flow enables you to map via these setting to update the entry. This means that subsequent workflow steps can include data provided by the API in notifications, conditional logic, etc. based on the updated field values.
The key is based on the JSON which your webhook/API would be responding with. If your API returns a complex JSON object within a key, then you can use a backslash to drill down into the values.
For example, this response JSON contains an array:
{
    "translations": [
        {
            "detected_source_language": "ES",
            "text": "Hello World!"
        }
    ]
}
In order to retrieve the translated text (Hello World), we need to use the key “translations\0\text” – we use the zero because the value for translations is an array and we need to target the first element in that array. For more complex scenarios, you can use the gravityflow_entry_webhook_response_mapping filter to define which part(s) you want into your selected Field(s).
If the API you are working with would return response values after the initial webhook has been processed (i.e. asynchronously), the Incoming Webhook extension will be of interest to you. With it, you can set up separate step(s) that await an incoming request from the API and provide similar response mapping capabilities for that inbound request. It can also be used to trigger the creation of new entries that start separate workflows.
The setting has two options:
- None
No entry values will be modified/updated with values from the API response. - Select Fields
Allows you to add as many rows of response mapping as needed. Each row contains two columns.- Key – Defined by 3rd party you are connecting to
- Value – Where should this value be mapped into the entry. It includes options for each form field, other entry properties and an ‘Add Custom Value’ for more complex scenarios.
Next Step Paths
How the outgoing webhook request is processed and responded to will determine which next step setting your workflow will follow. The 4 different next step settings correspond to the standard HTTP response codes:
| Next Step Type | Response Code(s) | Additional Info |
|---|---|---|
| Success | 200 – 299 | The only next step type in which the step is considered complete. |
| Client Error | 400 – 499 | You might want to check whether the Webhook URL is defined correctly or if the 3rd party system was offline at submission time. Some form of retry activity is recommended. |
| Server Error | 500 – 599 | The 3rd party system was unavailable to complete processing your request. Generally this is considered as a full failure, however some APIs may have performed some processes before the failure. Further investigation on the other system should be taken when an entry encounters this response code. |
| Other Error | Any other | Any other type of response code. Looking at Gravity Flow logging for the request/response will give you a better indication of what the exact response code and appropriate action to take might be. |
Example Use Cases
It probably won’t come as a surprise that as your business grows so do the requirements you look to your website to fulfill. While WordPress is a strong and flexible platform that can help you achieve the vast majority of those goals, it would be foolish to think that WordPress (or a plugin within it) is always the right/best solution for every requirement your business has. In those cases, webhooks and APIs are essential as they provide a real-time method to get data from your website into any number of separate system(s). Some of the common systems/requirements you might be looking to use the outgoing webhook step with could be:
- Posting updates to social networks like Facebook or Twitter
- Updating hosted Software-as-a-Service (SAAS) products like Jira or Mailchimp
- Triggering invoicing/payment systems such as Stripe or Freshbooks
- Complex data validation such as EU VAT number validation and VAT rate lookup
- Notifying Internal custom-built business applications to begin processes
- Provisioning resources on cloud based landscapes like Microsoft Azure or AWS
If you’d like to see an example of setup for a more advanced case involving webhook steps in a workflow, check out our blog post about Automating Agency Project Onboarding.
Example Webhook Usage
This example uses a very simple API – Foodish – that is a tasty but simple API that returns random pictures of food. It is an example public API which doesn’t require any authentication.
Prepare your ingredients form
Let’s start by creating a form that has 2 fields:
Add a Dropdown field

Give it a label of Food Category and use the Bulk Add choices button to populate the 10 food categories that Foodish supports: biryana, burger, butter-chicken, dessert, dosa, idly, pasta, pizza, rice, samosa
Add a Website field
Give it a label of Image URL and under the Advanced field settings put its’ visibility to Administrative. This will be where we will map the response from the API of a random food image into.
Save and publish the form
Use the Gravity Forms block or shortcode to add the form to a page on your website.
Add the Spices Workflow

Go to the Settings → Workflow menu and select the ‘Add New’ step button.
Select the with the Outgoing Webhook step type.
The Foodish API docs show that there are two different endpoints we could use:
- https://foodish-api.herokuapp.com/api/ to get any single random photo of food
- https://foodish-api.herokuapp.com/api/images/:food:/ to get a random photo from a particular food category such as /api/images/pizza/
We will use the latter one so that we can pass a dynamic merge tag for the selected food category.
- Fill the Outgoing Webhook URL field with the static part of the URL:
https://foodish-api.herokuapp.com/api/images/ - Use the {…} merge tag button to select your Food Category field.
- So the full Outgoing Webhook URL should look like:
https://foodish-api.herokuapp.com/api/images/{Food Category:1}
(Note your field ID for food category may be different)
Setup the rest of the settings and save the step.
- Request Method = GET
- Request Authentication Type = None
- Request Headers – None set
- Request Field Values – None mapped
- Response Mapping
The Foodish API docs give an example of the JSON response it would return
{“image”:”https://foodish-api.herokuapp.com/images/burger/burger101.jpg“}
So we can set the Key to ‘image’ and the Value to the website field. - Next Steps – all can be their defaults.
We are ready to submit the form to ask the Foodish API for a picture of our chosen food type. As soon as the entry is submitted, the workflow begins execution and the webhook call is made. In the case of pizza that would go to https://foodish-api.herokuapp.com/api/images/pizza.
When you go to review the entry in the Workflow → Status screen you will see:

- The timeline shows the URL the API call was made to and the response code.
- The Image URL is populated with a random image URL from the foodish-api.herokuapp.com domain.
- If you click on the image URL you will see a tasty picture!

Validating or Troubleshooting Requests
Your webhook/API documentation (and Gravity Flow docs to a certain degree) may give you the impression that integrating and automating webhooks is going to be the easiest 2 minute task of your life. We certainly hope that is the case! But when it comes to integrating multiple settings, website(s), API(s), you should plan that there will be a little more time/effort spent. The approaches outlined below can be most helpful when starting out a new outgoing webhook step or troubleshooting a problematic one:
Initial debugging focus
- Review the logs
Activate logging on the Gravity Forms->Settings page.
Check the logs to make sure your request and response are what you expect. - Verify brackets / formatting in settings
Merge tags use { }’s and so does JSON, which can, unfortunately, lead to small edge cases with the Raw Body format of syntactically correct JSON not parsing into the request object as you expect. In these cases, wrapping the value in extra ” quotes can mitigate the issue.
Example 1 – Issue – 90210 will not be in the request object
[ { “path”:”status”, “value”:{“id”:90210} } ]
Example 2 – Solved – 90210 will be in the request object
[ { “path”:”status”, “value”:{“id”:”90210″} } ]
Is the outgoing webhook step sending what you think it is / what you want it to?
A software or website like requestbin.com allows you to send the webhook to an interface that lets you see exactly what your step attempted to send each time the step was executed. More importantly, it removes the 3rd party API system entirely from the troubleshooting process.

This allows you to focus on whether the request format/values you are attempting to send match what the API docs call for. After ruling out typos, incorrect values, missing headers, etc. it also gives you something you can link to or screenshot if you are following up with a support team.
Note: The default RequestBins created are 100% public. Be aware that any settings or field values you submit to it could be seen by anyone. You should not include any sensitive data or credentials of your actual webhook call in the request.
What is a valid request the 3rd party API would accept with my type of data/scenario?
A software like Postman allows you to generate/simulate API requests to 3rd party API systems to verify it will behave like the documentation says it will when passed a certain set of data. More importantly, it removes WordPress and Gravity Flow entirely from the troubleshooting process.

It can be much faster to be able to directly modify URLs, headers, key/value parameters, etc. and with a single button (re) submit the API request. Depending on the complexity of the 3rd party system being called it can help you to iteratively test multiple actions before building them into the workflow step settings. Postman can also let you save and share request structures (or generate code that represent them) which can be helpful when seeking assistance from Gravity Flow support if you cannot quite get your webhook settings to send a successful request in the same way that Postman does.