

Step Purpose
The notification step allows you to send notifications that were created in the Gravity Forms Notifications tab or define specific notifications in its’ step settings. When the step is processed, an email will be delivered to the recipients with any merge tags replaced with values from the entry.
Step Settings
A Notification step type define any of the step settings common to all step types as well as specific notification settings. Before exploring them, it’s good to review what the standard Gravity Forms notifications are and how you configure them to send emails.
- Notifications are accessed under the form Settings > Notifications panel.
- You can have one (or more) notifications which send to one (or more) email addresses and can include routing options that allows notification to be sent to different email addresses depending on values selected in the form.
- They are triggered to occur based on form events – most commonly when the form is submitted.
- You can use dynamic merge tags to populate the notification recipient, subject, parts of the message or several other notification specific settings.
- The resulting email to be sent will include entry specific data.
The settings unique to the notification step type group under two main settings:
Gravity Forms Notifications
Each notification you have setup under the standard form Settings > Notifications panel will have a checkbox within this setting – including inactive ones. For any checkboxes you select, when the workflow arrives at this step it will automatically trigger those notifications. These standard notifications can only be assigned to specific email addresses or email field values from the form.
Workflow Notification
Enabling this setting will present you with a set of sub settings to define a new notification unique to this step. The majority of sub settings will be familiar to you from the standard notification screen. The key difference is that the recipient can be based on a WordPress user or role in addition to email field based options. The sub-settings are:
Send To
Choosing between the options of “Select” and “Conditional Routing” will display a different set of fields which let you define who the notification will be sent to.
Select
In this type, you can use the multi-select field to define which individual users, roles within your site, or email fields that the notification will be sent to. If you select a user, and their role, Gravity Flow will ensure only one copy of the message is delivered to them.

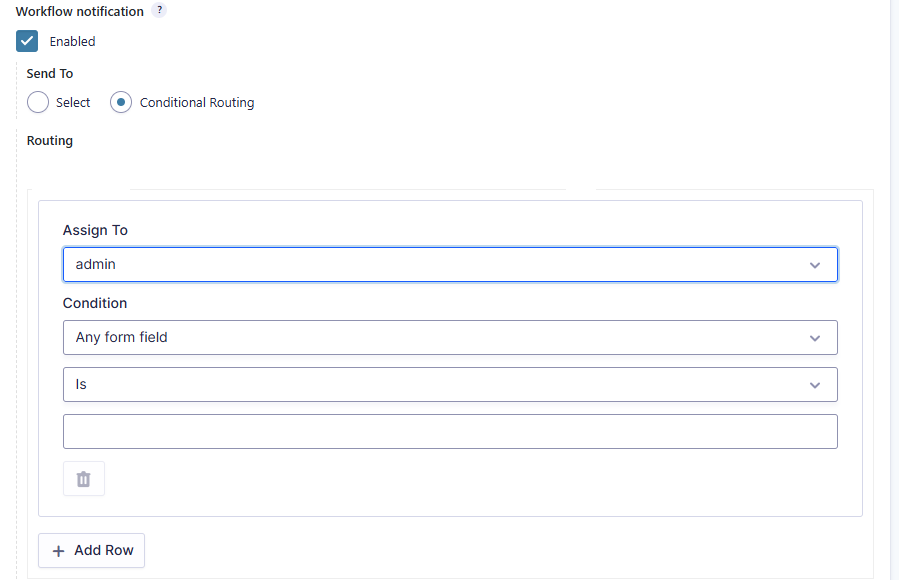
Conditional Routing
In this type, you can also define multiple recipients but with the added flexibility to control whether they should receive the notification based on entry values. The condition settings follow the standard for Gravity Forms:
Field/Data – What field (or entry data) should be considered?
Operator – How should that field/data be considered?
Value – What should the field/data be compared against?
From Name
When a notification email is sent, this is the name that will be displayed as the sender and can be set as either a static name or something dynamic based on merge tags from the data.
From Email
This is the email address that is displayed as the sender when receiving the notification. You may set this to {admin_email} or use a static email address, but always use a valid from email to prevent sending and deliverability issues.
Reply To / CC / BCC
These settings all involve setting valid email addresses for the corresponding parts of an email header. The BCC setting can be useful if you have an individual that wants to receive all notification emails when sending to multiple people but not get looped into the reply chains that may follow.
Subject and Message
These are the meat and potatoes of the notification, informing the recipient(s) about whatever details of the entry you configure in them. Depending on the tone used here, it can give the appearance of an automated reminder, a friendly, hand-crafted letter, or anything in between.
Regardless of whether you select a Gravity Forms Notifications or build it directly in the step settings, by executing as a step in the workflow, a timeline message will be added that identifies the date/time (and name of notification) sent.

If these two approaches don’t happen to fit your needs, there is a third approach that is available under the Settings > Notifications panel.
Event Based Notifications
Gravity Flow adds a number of events to the notification event setting You can target specific conditions using the conditional logic.
- Workflow: Approved or Rejected
- Workflow: User Input
- Workflow: Complete
- Workflow: Cancelled
Workflow: Approved or Rejected event
This will fire whenever an entry is approved or rejected regardless of the step and regardless of the status. Use the conditional logic setting to target either the ‘approved’ or ‘rejected’ status of a specific step. You may also need to specify the ‘Workflow Step’ to prevent the notification from being sent at later steps.
Workflow: User Input event
This fires whenever a user updates an entry in a User Input step, regardless of the step and regardless of whether the step was marked as complete or ‘in progress’. You can target specific conditions using the conditional logic.
Workflow: Complete event
This fires whenever a workflow is complete regardless of final status. You can target specific conditions using the conditional logic.
Workflow: Cancelled event
This fires whenever a workflow is cancelled. You can target specific conditions using the conditional logic.
Example Use Cases
User interactive step types (approval, user input, etc) have their own notification sub-settings which can include additional merge tags and functionality unique to the step type. So the scenarios for the notification step type tend to be a little more high-level by comparison.
Milestones
When a complex workflow completes various key steps, there might be a wider audience who should be informed about the process status.
History/Records
The entry available on your website will always maintain the latest values which have been updated in the form/workflow by various assignees. While there are ways to customize the forms to store revisions, they tend to invalidate one of the core ideas that the website acts as a “system of record” for the latest state of the entry. Sending out notifications with specific field values in message or attachment can provide another record that can be archived separately.
Group distribution lists
Perhaps your organization has a shared team mailbox (think [email protected]), but each member logs into the wordpress site with their own email/user account. You might want to set the approval/user input steps without notification and assign them to specific user(s) but have a separate notification to the group distribution list as more of an FYI.
Matching Existing Processes
If you have already built a large form with multiple notifications that then relies on separate tools to manually handle processes you are now building into a Gravity Flow workflow, it may make sense to migrate these into notification stems to give recipients some semblance of familiarity as the process changes over time.
Regarding email delivery
Regardless of why you set up a notification, you should rightly expect that whenever an entry reaches that step in the workflow the email will be delivered to the right addresses, users or role assignees. This is a good time to highlight that, technically, Gravity Flow doesn’t actually send the emails itself. All notifications are passed to WordPress for sending so if you happen to encounter message delivery timeouts or failures, you’ll usually want to start troubleshooting in WordPress’s core email functionality.
Adding Gravity SMTP and a reliable SMTP service like Postmark or Mailgun will help enormously. If you’re already using a reliable SMTP service and you’re still experiencing issues and you believe that Gravity Flow may be to blame – then you can activate logging in the Gravity Forms setting page, reproduce the issue and check the logs. If you see anything that looks wrong or if you have any trouble understanding the logs please contact our excellent support team and attach the log file or the link to the log file and we will assist you further.